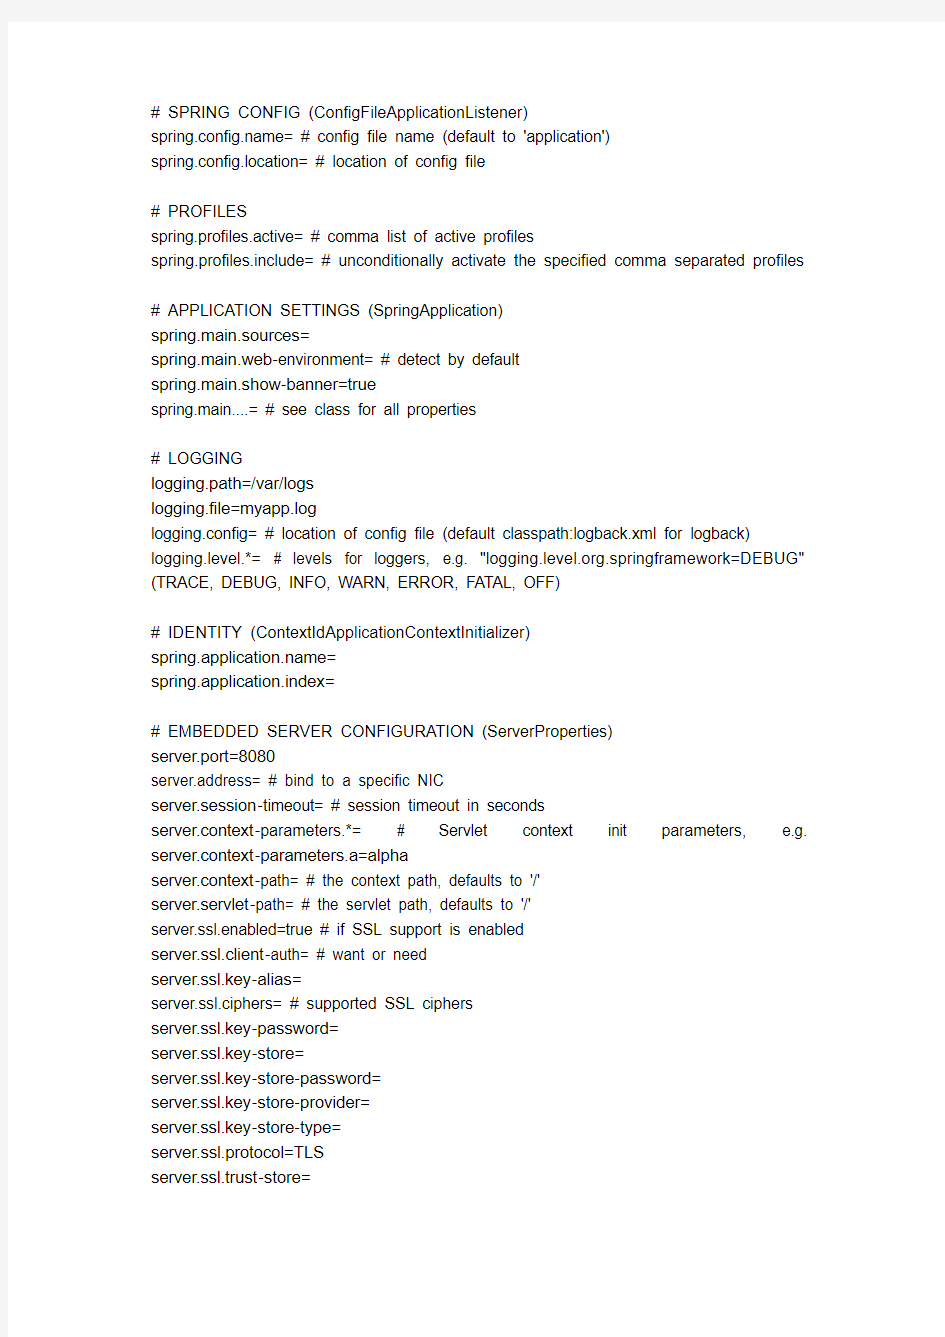
# SPRING CONFIG (ConfigFileApplicationListener)
https://www.doczj.com/doc/7918117702.html,= # config file name (default to 'application')
spring.config.location= # location of config file
# PROFILES
spring.profiles.active= # comma list of active profiles
spring.profiles.include= # unconditionally activate the specified comma separated profiles
# APPLICATION SETTINGS (SpringApplication)
spring.main.sources=
spring.main.web-environment= # detect by default
spring.main.show-banner=true
spring.main....= # see class for all properties
# LOGGING
logging.path=/var/logs
logging.file=myapp.log
logging.config= # location of config file (default classpath:logback.xml for logback) logging.level.*= # levels for loggers, e.g. "https://www.doczj.com/doc/7918117702.html,.springframework=DEBUG" (TRACE, DEBUG, INFO, WARN, ERROR, FATAL, OFF)
# IDENTITY (ContextIdApplicationContextInitializer)
https://www.doczj.com/doc/7918117702.html,=
spring.application.index=
# EMBEDDED SERVER CONFIGURATION (ServerProperties)
server.port=8080
server.address= # bind to a specific NIC
server.session-timeout= # session timeout in seconds
server.context-parameters.*= # Servlet context init parameters, e.g. server.context-parameters.a=alpha
server.context-path= # the context path, defaults to '/'
server.servlet-path= # the servlet path, defaults to '/'
server.ssl.enabled=true # if SSL support is enabled
server.ssl.client-auth= # want or need
server.ssl.key-alias=
server.ssl.ciphers= # supported SSL ciphers
server.ssl.key-password=
server.ssl.key-store=
server.ssl.key-store-password=
server.ssl.key-store-provider=
server.ssl.key-store-type=
server.ssl.protocol=TLS
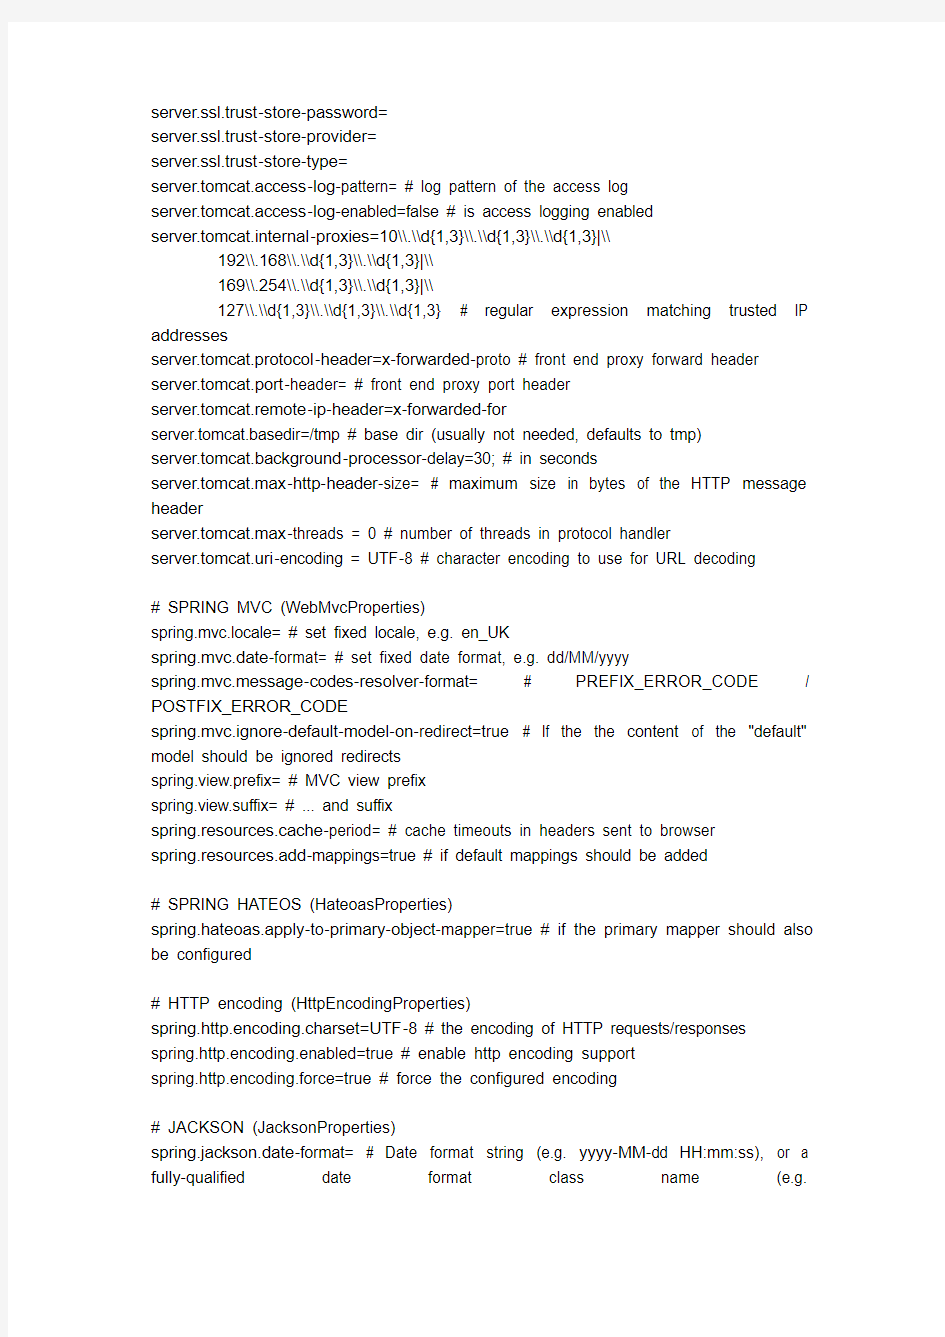
server.ssl.trust-store=
server.ssl.trust-store-password=
server.ssl.trust-store-provider=
server.ssl.trust-store-type=
server.tomcat.access-log-pattern= # log pattern of the access log
server.tomcat.access-log-enabled=false # is access logging enabled
server.tomcat.internal-proxies=10\\.\\d{1,3}\\.\\d{1,3}\\.\\d{1,3}|\\
192\\.168\\.\\d{1,3}\\.\\d{1,3}|\\
169\\.254\\.\\d{1,3}\\.\\d{1,3}|\\
127\\.\\d{1,3}\\.\\d{1,3}\\.\\d{1,3} # regular expression matching trusted IP addresses
server.tomcat.protocol-header=x-forwarded-proto # front end proxy forward header server.tomcat.port-header= # front end proxy port header
server.tomcat.remote-ip-header=x-forwarded-for
server.tomcat.basedir=/tmp # base dir (usually not needed, defaults to tmp)
server.tomcat.background-processor-delay=30; # in seconds
server.tomcat.max-http-header-size= # maximum size in bytes of the HTTP message header
server.tomcat.max-threads = 0 # number of threads in protocol handler
server.tomcat.uri-encoding = UTF-8 # character encoding to use for URL decoding
# SPRING MVC (WebMvcProperties)
spring.mvc.locale= # set fixed locale, e.g. en_UK
spring.mvc.date-format= # set fixed date format, e.g. dd/MM/yyyy
spring.mvc.message-codes-resolver-format= # PREFIX_ERROR_CODE / POSTFIX_ERROR_CODE
spring.mvc.ignore-default-model-on-redirect=true # If the the content of the "default" model should be ignored redirects
spring.view.prefix= # MVC view prefix
spring.view.suffix= # ... and suffix
spring.resources.cache-period= # cache timeouts in headers sent to browser
spring.resources.add-mappings=true # if default mappings should be added
# SPRING HATEOS (HateoasProperties)
spring.hateoas.apply-to-primary-object-mapper=true # if the primary mapper should also be configured
# HTTP encoding (HttpEncodingProperties)
spring.http.encoding.charset=UTF-8 # the encoding of HTTP requests/responses spring.http.encoding.enabled=true # enable http encoding support
spring.http.encoding.force=true # force the configured encoding
# JACKSON (JacksonProperties)
spring.jackson.date-format= # Date format string (e.g. yyyy-MM-dd HH:mm:ss), or a fully-qualified date format class name (e.g.
com.fasterxml.jackson.databind.util.ISO8601DateFormat)
spring.jackson.property-naming-strategy= # One of the constants on Jackson's PropertyNamingStrategy (e.g. CAMEL_CASE_TO_LOWER_CASE_WITH_UNDERSCORES) or the fully-qualified class name of a PropertyNamingStrategy subclass
spring.jackson.deserialization.*= # see Jackson's DeserializationFeature
spring.jackson.generator.*= # see Jackson's JsonGenerator.Feature
spring.jackson.mapper.*= # see Jackson's MapperFeature
spring.jackson.parser.*= # see Jackson's JsonParser.Feature
spring.jackson.serialization.*= # see Jackson's SerializationFeature
# THYMELEAF (ThymeleafAutoConfiguration)
spring.thymeleaf.check-template-location=true
spring.thymeleaf.prefix=classpath:/templates/
spring.thymeleaf.excluded-view-names= # comma-separated list of view names that should be excluded from resolution
spring.thymeleaf.view-names= # comma-separated list of view names that can be resolved
spring.thymeleaf.suffix=.html
spring.thymeleaf.mode=HTML5
spring.thymeleaf.encoding=UTF-8
spring.thymeleaf.content-type=text/html # ;charset=
spring.thymeleaf.cache=true # set to false for hot refresh
# FREEMARKER (FreeMarkerAutoConfiguration)
spring.freemarker.allow-request-override=false
spring.freemarker.cache=true
spring.freemarker.check-template-location=true
spring.freemarker.charset=UTF-8
spring.freemarker.content-type=text/html
spring.freemarker.expose-request-attributes=false
spring.freemarker.expose-session-attributes=false
spring.freemarker.expose-spring-macro-helpers=false
spring.freemarker.prefix=
spring.freemarker.request-context-attribute=
spring.freemarker.settings.*=
spring.freemarker.suffix=.ftl
spring.freemarker.template-loader-path=classpath:/templates/ # comma-separated list spring.freemarker.view-names= # whitelist of view names that can be resolved
# GROOVY TEMPLATES (GroovyTemplateAutoConfiguration)
spring.groovy.template.cache=true
spring.groovy.template.charset=UTF-8
spring.groovy.template.configuration.*= # See Groovy's TemplateConfiguration
spring.groovy.template.content-type=text/html
spring.groovy.template.prefix=classpath:/templates/
spring.groovy.template.suffix=.tpl
spring.groovy.template.view-names= # whitelist of view names that can be resolved
# VELOCITY TEMPLATES (VelocityAutoConfiguration)
spring.velocity.allow-request-override=false
spring.velocity.cache=true
spring.velocity.check-template-location=true
spring.velocity.charset=UTF-8
spring.velocity.content-type=text/html
spring.velocity.date-tool-attribute=
spring.velocity.expose-request-attributes=false
spring.velocity.expose-session-attributes=false
spring.velocity.expose-spring-macro-helpers=false
spring.velocity.number-tool-attribute=
spring.velocity.prefer-file-system-access=true # prefer file system access for template loading
spring.velocity.prefix=
spring.velocity.properties.*=
spring.velocity.request-context-attribute=
spring.velocity.resource-loader-path=classpath:/templates/
spring.velocity.suffix=.vm
spring.velocity.toolbox-config-location= # velocity Toolbox config location, for example "/WEB-INF/toolbox.xml"
spring.velocity.view-names= # whitelist of view names that can be resolved
# JERSEY (JerseyProperties)
spring.jersey.type=servlet # servlet or filter
spring.jersey.init= # init params
spring.jersey.filter.order=
# INTERNATIONALIZATION (MessageSourceAutoConfiguration)
spring.messages.basename=messages
spring.messages.cache-seconds=-1
spring.messages.encoding=UTF-8
# SECURITY (SecurityProperties)
https://www.doczj.com/doc/7918117702.html,=user # login username
https://www.doczj.com/doc/7918117702.html,er.password= # login password
https://www.doczj.com/doc/7918117702.html,er.role=USER # role assigned to the user
security.require-ssl=false # advanced settings ...
security.enable-csrf=false
security.basic.enabled=true
security.basic.realm=Spring
security.basic.path= # /**
security.filter-order=0
security.headers.xss=false
security.headers.cache=false
security.headers.frame=false
security.headers.content-type=false
security.headers.hsts=all # none / domain / all
security.sessions=stateless # always / never / if_required / stateless
security.ignored=false
# DATASOURCE (DataSourceAutoConfiguration & DataSourceProperties)
https://www.doczj.com/doc/7918117702.html,= # name of the data source
spring.datasource.initialize=true # populate using data.sql
spring.datasource.schema= # a schema (DDL) script resource reference
spring.datasource.data= # a data (DML) script resource reference
spring.datasource.sql-script-encoding= # a charset for reading SQL scripts
spring.datasource.platform= # the platform to use in the schema resource (schema-${platform}.sql)
spring.datasource.continue-on-error=false # continue even if can't be initialized
spring.datasource.separator=; # statement separator in SQL initialization scripts spring.datasource.driver-class-name= # JDBC Settings...
spring.datasource.url=
https://www.doczj.com/doc/7918117702.html,ername=
spring.datasource.password=
spring.datasource.jndi-name= # For JNDI lookup (class, url, username & password are ignored when set)
spring.datasource.max-active=100 # Advanced configuration...
spring.datasource.max-idle=8
spring.datasource.min-idle=8
spring.datasource.initial-size=10
spring.datasource.validation-query=
spring.datasource.test-on-borrow=false
spring.datasource.test-on-return=false
spring.datasource.test-while-idle=
spring.datasource.time-between-eviction-runs-millis=
spring.datasource.min-evictable-idle-time-millis=
spring.datasource.max-wait=
spring.datasource.jmx-enabled=false # Export JMX MBeans (if supported)
# DATASOURCE (PersistenceExceptionTranslationAutoConfiguration
spring.dao.exceptiontranslation.enabled=true
# MONGODB (MongoProperties)
spring.data.mongodb.host= # the db host
spring.data.mongodb.port=27017 # the connection port (defaults to 27107)
spring.data.mongodb.uri=mongodb://localhost/test # connection URL
spring.data.mongodb.database=
spring.data.mongodb.authentication-database=
spring.data.mongodb.grid-fs-database=
https://www.doczj.com/doc/7918117702.html,ername=
spring.data.mongodb.password=
spring.data.mongodb.repositories.enabled=true # if spring data repository support is enabled
# JPA (JpaBaseConfiguration, HibernateJpaAutoConfiguration)
spring.jpa.properties.*= # properties to set on the JPA connection
spring.jpa.open-in-view=true
spring.jpa.show-sql=true
spring.jpa.database-platform=
spring.jpa.database=
spring.jpa.generate-ddl=false # ignored by Hibernate, might be useful for other vendors spring.jpa.hibernate.naming-strategy= # naming classname
spring.jpa.hibernate.ddl-auto= # defaults to create-drop for embedded dbs
spring.data.jpa.repositories.enabled=true # if spring data repository support is enabled
# JTA (JtaAutoConfiguration)
spring.jta.log-dir= # transaction log dir
spring.jta.*= # technology specific configuration
# SOLR (SolrProperties})
spring.data.solr.host=http://127.0.0.1:8983/solr
spring.data.solr.zk-host=
spring.data.solr.repositories.enabled=true # if spring data repository support is enabled
# ELASTICSEARCH (ElasticsearchProperties})
spring.data.elasticsearch.cluster-name= # The cluster name (defaults to elasticsearch) spring.data.elasticsearch.cluster-nodes= # The address(es) of the server node (comma-separated; if not specified starts a client node)
spring.data.elasticsearch.repositories.enabled=true # if spring data repository support is enabled
# DATA RESET (RepositoryRestConfiguration})
spring.data.rest.base-uri= # base URI against which the exporter should calculate its links
# FLYWAY (FlywayProperties)
flyway.check-location=false # check that migration scripts location exists
flyway.locations=classpath:db/migration # locations of migrations scripts
flyway.schemas= # schemas to update
flyway.init-version= 1 # version to start migration
flyway.init-sqls= # SQL statements to execute to initialize a connection immediately after obtaining it
flyway.sql-migration-prefix=V
flyway.sql-migration-suffix=.sql
flyway.enabled=true
flyway.url= # JDBC url if you want Flyway to create its own DataSource
https://www.doczj.com/doc/7918117702.html,er= # JDBC username if you want Flyway to create its own DataSource flyway.password= # JDBC password if you want Flyway to create its own DataSource
# LIQUIBASE (LiquibaseProperties)
liquibase.change-log=classpath:/db/changelog/db.changelog-master.yaml
liquibase.check-change-log-location=true # check the change log location exists liquibase.contexts= # runtime contexts to use
liquibase.default-schema= # default database schema to use
liquibase.drop-first=false
liquibase.enabled=true
liquibase.url= # specific JDBC url (if not set the default datasource is used)
https://www.doczj.com/doc/7918117702.html,er= # user name for liquibase.url
liquibase.password= # password for liquibase.url
# JMX
spring.jmx.enabled=true # Expose MBeans from Spring
# RABBIT (RabbitProperties)
spring.rabbitmq.host= # connection host
spring.rabbitmq.port= # connection port
spring.rabbitmq.addresses= # connection addresses (e.g. myhost:9999,otherhost:1111) https://www.doczj.com/doc/7918117702.html,ername= # login user
spring.rabbitmq.password= # login password
spring.rabbitmq.virtual-host=
spring.rabbitmq.dynamic=
# REDIS (RedisProperties)
spring.redis.database= # database name
spring.redis.host=localhost # server host
spring.redis.password= # server password
spring.redis.port=6379 # connection port
spring.redis.pool.max-idle=8 # pool settings ...
spring.redis.pool.min-idle=0
spring.redis.pool.max-active=8
spring.redis.pool.max-wait=-1
spring.redis.sentinel.master= # name of Redis server
spring.redis.sentinel.nodes= # comma-separated list of host:port pairs
# ACTIVEMQ (ActiveMQProperties)
spring.activemq.broker-url=tcp://localhost:61616 # connection URL
https://www.doczj.com/doc/7918117702.html,er=
spring.activemq.password=
spring.activemq.in-memory=true # broker kind to create if no broker-url is specified spring.activemq.pooled=false
# HornetQ (HornetQProperties)
spring.hornetq.mode= # connection mode (native, embedded)
spring.hornetq.host=localhost # hornetQ host (native mode)
spring.hornetq.port=5445 # hornetQ port (native mode)
spring.hornetq.embedded.enabled=true # if the embedded server is enabled (needs hornetq-jms-server.jar)
spring.hornetq.embedded.server-id= # auto-generated id of the embedded server (integer)
spring.hornetq.embedded.persistent=false # message persistence
spring.hornetq.embedded.data-directory= # location of data content (when persistence is enabled)
spring.hornetq.embedded.queues= # comma-separated queues to create on startup spring.hornetq.embedded.topics= # comma-separated topics to create on startup spring.hornetq.embedded.cluster-password= # customer password (randomly generated by default)
# JMS (JmsProperties)
spring.jms.jndi-name= # JNDI location of a JMS ConnectionFactory
spring.jms.pub-sub-domain= # false for queue (default), true for topic
# Email (MailProperties)
spring.mail.host=https://www.doczj.com/doc/7918117702.html, # mail server host
spring.mail.port= # mail server port
https://www.doczj.com/doc/7918117702.html,ername=
spring.mail.password=
spring.mail.default-encoding=UTF-8 # encoding to use for MimeMessages
spring.mail.properties.*= # properties to set on the JavaMail session
# SPRING BATCH (BatchDatabaseInitializer)
https://www.doczj.com/doc/7918117702.html,s=job1,job2
spring.batch.job.enabled=true
spring.batch.initializer.enabled=true
spring.batch.schema= # batch schema to load
# AOP
spring.aop.auto=
spring.aop.proxy-target-class=
# FILE ENCODING (FileEncodingApplicationListener)
spring.mandatory-file-encoding=false
# SPRING SOCIAL (SocialWebAutoConfiguration)
spring.social.auto-connection-views=true # Set to true for default connection views or false if you provide your own
# SPRING SOCIAL FACEBOOK (FacebookAutoConfiguration)
spring.social.facebook.app-id= # your application's Facebook App ID
spring.social.facebook.app-secret= # your application's Facebook App Secret
# SPRING SOCIAL LINKEDIN (LinkedInAutoConfiguration)
spring.social.linkedin.app-id= # your application's LinkedIn App ID
spring.social.linkedin.app-secret= # your application's LinkedIn App Secret
# SPRING SOCIAL TWITTER (TwitterAutoConfiguration)
spring.social.twitter.app-id= # your application's Twitter App ID
spring.social.twitter.app-secret= # your application's Twitter App Secret
# SPRING MOBILE SITE PREFERENCE (SitePreferenceAutoConfiguration)
spring.mobile.sitepreference.enabled=true # enabled by default
# SPRING MOBILE DEVICE VIEWS (DeviceDelegatingViewResolverAutoConfiguration) spring.mobile.devicedelegatingviewresolver.enabled=true # disabled by default
spring.mobile.devicedelegatingviewresolver.normal-prefix=
spring.mobile.devicedelegatingviewresolver.normal-suffix=
spring.mobile.devicedelegatingviewresolver.mobile-prefix=mobile/
spring.mobile.devicedelegatingviewresolver.mobile-suffix=
spring.mobile.devicedelegatingviewresolver.tablet-prefix=tablet/
spring.mobile.devicedelegatingviewresolver.tablet-suffix=
# ----------------------------------------
# ACTUATOR PROPERTIES
# ----------------------------------------
# MANAGEMENT HTTP SERVER (ManagementServerProperties)
management.port= # defaults to 'server.port'
management.address= # bind to a specific NIC
management.context-path= # default to '/'
management.add-application-context-header= # default to true
management.security.enabled=true # enable security
management.security.role=ADMIN # role required to access the management endpoint management.security.sessions=stateless # session creating policy to use (always, never, if_required, stateless)
# PID FILE (ApplicationPidFileWriter)
spring.pidfile= # Location of the PID file to write
# ENDPOINTS (AbstractEndpoint subclasses)
endpoints.autoconfig.id=autoconfig
endpoints.autoconfig.sensitive=true
endpoints.autoconfig.enabled=true
endpoints.beans.id=beans
endpoints.beans.sensitive=true
endpoints.beans.enabled=true
endpoints.configprops.id=configprops
endpoints.configprops.sensitive=true
endpoints.configprops.enabled=true
endpoints.configprops.keys-to-sanitize=password,secret,key # suffix or regex endpoints.dump.id=dump
endpoints.dump.sensitive=true
endpoints.dump.enabled=true
endpoints.env.id=env
endpoints.env.sensitive=true
endpoints.env.enabled=true
endpoints.env.keys-to-sanitize=password,secret,key # suffix or regex
endpoints.health.id=health
endpoints.health.sensitive=true
endpoints.health.enabled=true
endpoints.health.mapping.*= # mapping of health statuses to HttpStatus codes endpoints.health.time-to-live=1000
https://www.doczj.com/doc/7918117702.html,.id=info
https://www.doczj.com/doc/7918117702.html,.sensitive=false
https://www.doczj.com/doc/7918117702.html,.enabled=true
endpoints.mappings.enabled=true
endpoints.mappings.id=mappings
endpoints.mappings.sensitive=true
endpoints.metrics.id=metrics
endpoints.metrics.sensitive=true
endpoints.metrics.enabled=true
endpoints.shutdown.id=shutdown
endpoints.shutdown.sensitive=true
endpoints.shutdown.enabled=false
endpoints.trace.id=trace
endpoints.trace.sensitive=true
endpoints.trace.enabled=true
# HEALTH INDICATORS (previously health.*)
management.health.db.enabled=true
management.health.diskspace.enabled=true
management.health.mongo.enabled=true
management.health.rabbit.enabled=true
management.health.redis.enabled=true
management.health.solr.enabled=true
management.health.diskspace.path=.
management.health.diskspace.threshold=10485760
management.health.status.order=DOWN, OUT_OF_SERVICE, UNKNOWN, UP
# MVC ONLY ENDPOINTS
endpoints.jolokia.path=jolokia
endpoints.jolokia.sensitive=true
endpoints.jolokia.enabled=true # when using Jolokia
# JMX ENDPOINT (EndpointMBeanExportProperties)
endpoints.jmx.enabled=true
endpoints.jmx.domain= # the JMX domain, defaults to 'org.springboot'
endpoints.jmx.unique-names=false
endpoints.jmx.static-names=
# JOLOKIA (JolokiaProperties)
jolokia.config.*= # See Jolokia manual
# REMOTE SHELL
shell.auth=simple # jaas, key, simple, spring
https://www.doczj.com/doc/7918117702.html,mand-refresh-interval=-1
https://www.doczj.com/doc/7918117702.html,mand-path-patterns= # classpath*:/commands/**, classpath*:/crash/commands/**
shell.config-path-patterns= # classpath*:/crash/*
shell.disabled-commands=jpa*,jdbc*,jndi* # comma-separated list of commands to disable
shell.disabled-plugins=false # don't expose plugins
shell.ssh.enabled= # ssh settings ...
shell.ssh.key-path=
shell.ssh.port=
shell.telnet.enabled= # telnet settings ...
shell.telnet.port=
shell.auth.jaas.domain= # authentication settings ...
shell.auth.key.path=
https://www.doczj.com/doc/7918117702.html,=
https://www.doczj.com/doc/7918117702.html,er.password=
shell.auth.spring.roles=
# GIT INFO
spring.git.properties= # resource ref to generated git info properties file
springMVC详解以及注解说明 基于注释(Annotation)的配置有越来越流行的趋势,Spring 2.5 顺应这种趋势,提供了完全基于注释配置Bean、装配Bean 的功能,您可以使用基于注释的Spring IoC 替换原来基于XML 的配置。本文通过实例详细讲述了Spring 2.5 基于注释IoC 功能的使用。 概述 注释配置相对于XML 配置具有很多的优势: ? 它可以充分利用Java 的反射机制获取类结构信息,这些信息可以有效减少配置的工作。如使用JPA 注释配置ORM 映射时,我们就不需要指定PO 的属性名、类型等信息,如果关系表字段和PO 属性名、类型都一致,您甚至无需编写任务属性映射信息——因为这些信息都可以通过Java 反射机制获取。 ? 注释和Java 代码位于一个文件中,而XML 配置采用独立的配置文件,大多数配置信息在程序开发完成后都不会调整,如果配置信息和Java 代码放在一起,有助于增强程序的内聚性。而采用独立的XML 配置文件,程序员在编写一个功能时,往往需要在程序文件和配置文件中不停切换,这种思维上的不连贯会降低开发效率。 因此在很多情况下,注释配置比XML 配置更受欢迎,注释配置有进一步流行的趋势。Spring 2.5 的一大增强就是引入了很多注释类,现在您已经可以使用注释配置完成大部分XML 配置的功能。在这篇文章里,我们将向您讲述使用注释进行Bean 定义和依赖注入的内容。 Spring2.5的注释 Spring 2.5 提供了AutowiredAnnotationBeanPostProcessor、CommonAnnotationBeanPostProcessor、PersistenceAnnotationBeanPostProcessor 和RequiredAnnotationBeanPostProcessor这四个主要的关于Annotation 的BeanPostProcessor。 我们可以使用
spring的@Transactional注解详细用法 各位读友大家好!你有你的木棉,我有我的文章,为了你的木棉,应读我的文章!若为比翼双飞鸟,定是人间有情人!若读此篇优秀文,必成天上比翼鸟! spring的@Transactional注解详细用法Spring Framework对事务管理提供了一致的抽象,其特点如下:为不同的事务API 提供一致的编程模型,比如JTA(Java Transaction API), JDBC, Hibernate, JPA(Java Persistence API和JDO(Java Data Objects)支持声明式事务管理,特别是基于注解的声明式事务管理,简单易用提供比其他事务API如JTA更简单的编程式事务管理API与spring数据访问抽象的完美集成事务管理方式spring支持编程式事务管理和声明式事务管理两种方式。编程式事务管理使用TransactionTemplate或者直接使用底层的PlatformTransactionManager。对于编程式事务管理,spring推荐使用TransactionTemplate。声明式事务管理建立在AOP之上的。其本质是对方法前后进行拦截,然后在目标方法开始之前创建或者加入一个事务,在执行完目标方法之后根据执行情况提交或者回滚事务。声明式事务最大的优点就是不需要通过编程的方式管理事务,这样就不需要在业务逻辑代码中掺杂事务管理的代码,只需在配置文件中做相关的事务规则声明(或通过基于@Transactional注解的方式),便可以将事务规则应用到业务逻辑中。显然声明式事务管理要优于编程式事务管理,这正是spring
Spring注解详解 目录 一、注解说明 (2) 1.使用简化配置 (2) 2.使用Bean定义注解 (2) 3.Spring支持以下4种类型的过滤方式: (2) 二、注解介绍 (2) 1.@Controller (3) 2.@Service (3) 3.@Autowired (4) 4.@RequestMapping (4) 5.@RequestParam (5) 6.@ModelAttribute (6) 7.@Cacheable和@CacheFlush (7) 8.@Resource (7) 9.@PostConstruct和@PreDestroy (8) 10.@Repository (8) 11.@Component(不推荐使用) (8) 12.@Scope (8) 13.@SessionAttributes (9) 14.@InitBinder (9) 15.@Required (9) 16.@Qualifier (10)
一、注解说明 1.使用简化配置
Spring对于Bean的依赖注入,支持多种注解方式: 直观上看起来,@Autowired是Spring提供的注解,其他几个都是JDK本身内建的注解,Spring 对这些注解也进行了支持。但是使用起来这三者到底有什么区别呢?笔者经过方法的测试,发现一些有意思的特性。 区别总结如下: 一、@Autowired有个required属性,可以配置为false,这种情况下如果没有找到对应的bean 是不会抛异常的。@Inject和@Resource没有提供对应的配置,所以必须找到否则会抛异常。 二、@Autowired和@Inject基本是一样的,因为两者都是使用AutowiredAnnotationBeanPostProcessor来处理依赖注入。但是@Resource是个例外,它使用的是CommonAnnotationBeanPostProcessor来处理依赖注入。当然,两者都是BeanPostProcessor。
TIPS Qualified name VS Bean name 在Spring设计中,Qualified name并不等同于Bean name,后者必须是唯一的,但是前者类似于tag或者group的作用,对特定的bean进行分类。可以达到getByTag(group)的效果。对于XML配置的bean,可以通过id属性指定bean name(如果没有指定,默认使用类名首字母小写),通过标签指定qualifier name: 如果是通过注解方式,那么可以通过@Qualifier注解指定qualifier name,通过@Named或者@Component(@Service,@Repository等)的value值指定bean name:
SpringMVC常用注解: 1、@Controller 在SpringMVC 中,控制器Controller 负责处理由DispatcherServlet 分发的请求,它把用户请求的数据经过业务处理层处理之后封装成一个Model ,然后再把该Model 返回给对应的View 进行展示。在SpringMVC 中提供了一个非常简便的定义Controller 的方法,你无需继承特定的类或实现特定的接口,只需使用@Controller 标记一个类是Controller ,然后使用@RequestMapping 和@RequestParam 等一些注解用以定义URL 请求和Controller 方法之间的映射,这样的Controller 就能被外界访问到。此外Controller 不会直接依赖于HttpServletRequest 和HttpServletResponse 等HttpServlet 对象,它们可以通过Controller 的方法参数灵活的获取到。 @Controller 用于标记在一个类上,使用它标记的类就是一个SpringMVC Controller 对象。分发处理器将会扫描使用了该注解的类的方法,并检测该方法是否使用了 @RequestMapping 注解。@Controller 只是定义了一个控制器类,而使用 @RequestMapping 注解的方法才是真正处理请求的处理器。单单使用@Controller 标记在一个类上还不能真正意义上的说它就是SpringMVC 的一个控制器类,因为这个时候Spring 还不认识它。那么要如何做Spring 才能认识它呢?这个时候就需要我们把这个控制器类交给Spring 来管理。有两种方式: (1)在SpringMVC 的配置文件中定义MyController 的bean 对象。 (2)在SpringMVC 的配置文件中告诉Spring 该到哪里去找标记为@Controller 的Controller 控制器。
使用Spring2.5的Autowired实现注释型的IOC 161641 使用Spring2.5的新特性——Autowired可以实现快速的自动注入,而无需在xml文档里面添加bean的声明,大大减少了xml文档的维护。(偶喜欢这个功能,因为偶对xml不感冒)。以下是一个例子: 先编写接口Man: public interface Man { public String sayHello(); } 然后写Man的实现类Chinese和American: @Service public class Chinese implements Man{ public String sayHello() { return "I am Chinese!"; } } @Service public class American implements Man{ public String sayHello() { return "I am American!"; } } @Service注释表示定义一个bean,自动根据bean的类名实例化一个首写字母为小写的bean,例如Chinese实例化为chinese,American实例化为american,如果需要自己改名字则:@Service("你自己改的bean名")。 beans.xml
一、各种注解方式 1.@Autowired注解(不推荐使用,建议使用@Resource) @Autowired可以对成员变量、方法和构造函数进行标注,来完成自动装配的工作。 @Autowired的标注位置不同,它们都会在Spring在初始化这个bean时,自动装配这个属性。要使@Autowired能够工作,还需要在配置文件中加入以下 Xml代码 1.
Spring注解的参数 二、Spring2.5引入注解式处理器支持,通过@Controller和@RequestMapping注解定义我们的处理器类。并且提供了一组强大的注解: 需要通过处理器映射DefaultAnnotationHandlerMapping和处理器适配器AnnotationMethodHandlerAdapter来开启支持@Controller和@RequestMapping注解的处理器。 @Controller:用于标识是处理器类; @RequestMapping:请求到处理器功能方法的映射规则; @RequestParam:请求参数到处理器功能处理方法的方法参数上的绑定;@RequestParam是传参数的
@ModelAttribute:请求参数到命令对象的绑定; @SessionAttributes:用于声明session级别存储的属性,放置在处理器类上,通常列出模型属性(如@ModelAttribute)对应的名称,则这些属性会透明的保存到session 中; @InitBinder:自定义数据绑定注册支持,用于将请求参数转换到命令对象属性的对应类型; 三、Spring3.0引入RESTful架构风格支持(通过@PathVariable注解和一些其他特性支持),且又引入了更多的注解支持: @CookieValue:cookie数据到处理器功能处理方法的方法参数上的绑定; @RequestHeader:请求头(header)数据到处理器功能处理方法的方法参数上的绑定; @RequestBody:请求的body体的绑定(通过HttpMessageConverter进行类型转换); @ResponseBody:处理器功能处理方法的返回值作为响应体(通过HttpMessageConverter进行类型转换);
Spring MVC 第一讲:SpringMVC页面跳转实例,通过请求访问start.jsp页面 1.1加包 1.2web.xml
传统的Spring做法是使用.xml文件来对bean进行注入或者是配置aop、事物,这么做有两个缺点: 1、如果所有的内容都配置在.xml文件中,那么.xml文件将会十分庞大;如果按需求分开.xml文件,那么.xml文件又会非常多。总之这将导致配置文件的可读性与可维护性变得很低。 2、在开发中在.java文件和.xml文件之间不断切换,是一件麻烦的事,同时这种思维上的不连贯也会降低开发的效率。 为了解决这两个问题,Spring引入了注解,通过"@XXX"的方式,让注解与Java Bean紧密结合,既大大减少了配置文件的体积,又增加了Java Bean的可读性与内聚性。 不使用注解: 先看一个不使用注解的Spring示例,在这个示例的基础上,改成注解版本的,这样也能看出使用与不使用注解之间的区别,先定义一个老虎: package com.spring.model; public class Tiger { private String tigerName="TigerKing"; public String toString(){ return "TigerName:"+tigerName; } } 再定义一个猴子: package com.spring.model; public class Monkey { private String monkeyName = "MonkeyKing";
public String toString(){ return "MonkeyName:" + monkeyName; } } 定义一个动物园: package com.spring.model; public class Zoo { private Tiger tiger; private Monkey monkey; public Tiger getTiger() { return tiger; } public void setTiger(Tiger tiger) { this.tiger = tiger; } public Monkey getMonkey() { return monkey; } public void setMonkey(Monkey monkey) { this.monkey = monkey; } public String toString(){ return tiger + "\n" + monkey; } } spring的配置文件这么写:
1.使用Spring注解来注入属性 1.1.使用注解以前我们是怎样注入属性的 类的实现: Java代码 1public class UserManagerImpl implements UserManager{ 2private UserDao userDao; 3public void setUserDao(UserDao userDao){ https://www.doczj.com/doc/7918117702.html,erDao=userDao; 5} 6... 7} 配置文件: Java代码 8
1.2.引入@Autowired注解(不推荐使用,建议使用@Resource) 类的实现(对成员变量进行标注) Java代码 14public class UserManagerImpl implements UserManager{ 15@Autowired 16private UserDao userDao; 17... 18} 或者(对方法进行标注) Java代码 19public class UserManagerImpl implements UserManager{ 20private UserDao userDao; 21@Autowired 22public void setUserDao(UserDao userDao){ https://www.doczj.com/doc/7918117702.html,erDao=userDao; 24} 25... 26} 配置文件 Java代码 27
概述 注释配置相对于XML 配置具有很多的优势: ?它可以充分利用Java 的反射机制获取类结构信息,这些信息可以有效减少配置的工作。如使用JPA 注释配置ORM 映射时,我们就不需要指定PO 的属性 名、类型等信息,如果关系表字段和PO 属性名、类型都一致,您甚至无需编 写任务属性映射信息——因为这些信息都可以通过Java 反射机制获取。 ?注释和Java 代码位于一个文件中,而XML 配置采用独立的配置文件,大多数配置信息在程序开发完成后都不会调整,如果配置信息和Java 代码放在一起, 有助于增强程序的内聚性。而采用独立的XML 配置文件,程序员在编写一个功 能时,往往需要在程序文件和配置文件中不停切换,这种思维上的不连贯会降低 开发效率。 package com.baobaotao; public class Office { private String officeNo =”001”; //省略 get/setter @Override public String toString() { return "officeNo:" + officeNo; } } Car 拥有两个属性:
清单2. Car.java package com.baobaotao; public class Car { private String brand; private double price; // 省略 get/setter @Override public String toString() { return "brand:" + brand + "," + "price:" + price; } } Boss 拥有Office 和Car 类型的两个属性: 清单3. Boss.java package com.baobaotao; public class Boss { private Car car; private Office office; // 省略 get/setter @Override public String toString() { return "car:" + car + "\n" + "office:" + office; } } 我们在Spring 容器中将Office 和Car 声明为Bean,并注入到Boss Bean 中:下面是使用传统XML 完成这个工作的配置文件beans.xml: 清单4. beans.xml 将以上三个类配置成Bean
SpringMVC 中常用的注解 spring 从2.5版本开始在编程中引入注解,用户可以使用@RequestMapping , @RequestParam , @ModelAttribute 等等这样类似的注解。到目前为止,Spring 的版本虽然发生了很大的变化,但注解的特性却是一直延续下来,并不断扩展,让广大的开发人员的双手变的更轻松起来,这都离不开Annotation 的强大作用,今天我们就一起来看看Spring MVC 4中常用的那些注解吧。 1. @Controller Controller 控制器是通过服务接口定义的提供访问应用程序的一种行为,它解释用户的输入,将其转换成一个模型然后将试图呈献给用户。Spring MVC 使用 @Controller 定义控制器,它还允许自动检测定义在类路径下的组件并自动注册。如想自动检测生效,需在XML 头文件下引入 spring-context: 1 2 3 4 5 6 7 8 9 10 11 1 2 4.Spring相关编码规范 4.1 Spring 注解使用规范 (1)注入依赖对象: 使用@Resource ,不使用@Autowired (2)将组件纳入Spring容器管理: 使用@Service、@Controller、@Repository,不使用@Component @Controller注解的使用规范:只能应用于action @Scope("prototype") @Controller @SuppressWarnings("serial") public class ExamUserSaveAction extends ActionSupport { @Resource private ExamUserService examUserService; } @Service注解的使用规范:只能应用于service 有接口时规范如下: @Service("examUserService") public class ExamUserServiceImpl implements ExamUserService { … } 无接口时规范如下: @Service public class ExamUserService { … } @Repository注解:由于目前各工程DAO依赖于spring对ibatis的支持,暂时不使用此注解。 (3) service/dao 无接口时,服务层代码放置到cn.xxt.功能名.service/dao包下。 备注:要尽量避免在老功能优化中直接写实现,去掉接口。因为这样的话,老功能中service/dao包下,将会含有接口和类。在做新功能时,可以考虑不使用接口。 4.2 配置文件编写规范 (1)打开自动扫描classpath下特定注解文件的的开关与注入依赖对象的开关 frameworkconfig/spring/root.xml文件中打开{自动扫描组件配置}: @Repository、@Service、@Controller 和@Component @Repository、@Service、@Controller 和@Component 将类标识为Bean Spring 自2.0 版本开始,陆续引入了一些注解用于简化Spring 的开发。@Repository注解便属于最先引入的一批,它用于将数据访问层(DAO 层) 的类标识为Spring Bean。具体只需将该注解标注在DAO类上即可。同时,为了让Spring 能够扫描类路径中的类并识别出@Repository 注解,需要在XML 配置文件中启用Bean 的自动扫描功能,这可以通过 Spring注解学习手札(一)构建简单Web应用 文章分类:Java编程 近来工作发生了一些变化,有必要学习一下Spring注解了! 网上找了一些个例子,总的说来比较土,大多数是转载摘抄,按照提示弄下来根本都运行不了,索性自己趟一遍这浑水,在这里留下些个印记。 这次,先来构建一个极为简单的web应用,从controller到dao。不考虑具体实现,只是先对整体架构有一个清晰的了解。日后在分层细述每一层的细节。 相关参考: Spring注解学习手札(一)构建简单Web应用 Spring注解学习手札(二)控制层梳理 Spring注解学习手札(三)表单页面处理 Spring注解学习手札(四)持久层浅析 Spring注解学习手札(五)业务层事务处理 Spring注解学习手札(六)测试 我们将用到如下jar包: 引用 aopalliance-1.0.jar commons-logging-1.1.1.jar log4j-1.2.15.jar spring-beans-2.5.6.jar spring-context-2.5.6.jar spring-context-support-2.5.6.jar spring-core-2.5.6.jar spring-tx-2.5.6.jar spring-web-2.5.6.jar spring-webmvc-2.5.6.jar 先看web.xml Xml代码 JA V A 注解的几大作用及使用方法详解 注解(Annotation) 1、Annotation的工作原理: JDK5.0中提供了注解的功能,允许开发者定义和使用自己的注解类型。该功能由一个定义注解类型的语法和描述一个注解声明的语法,读取注解的API,一个使用注解修饰的class 文件和一个注解处理工具组成。 Annotation并不直接影响代码的语义,但是他可以被看做是程序的工具或者类库。它会反过来对正在运行的程序语义有所影响。 Annotation可以从源文件、class文件或者在运行时通过反射机制多种方式被读取。 常见的作用 有以下几种: 1,生成文档。这是最常见的,也是java 最早提供的注解。 常用的有@see @param @return 等 2,跟踪代码依赖性,实现替代配置文件功能。 比较常见的是spring 2.5 开始的基于注解配置。作用就是减少配置。现在的框架基本都使用了这种配置来减少配置文件的数量。 3,在编译时进行格式检查。 如@override 放在方法前,如果你这个方法并不是覆盖了超类方法,则编译时就能检查出。 *@interface用来声明一个注解,其中的每一个方法实际上是声明了一个配置参数。 *方法的名称就是参数的名称,返回值类型就是参数的类型。 *可以通过default来声明参数的默认值。 父类,接口 https://www.doczj.com/doc/7918117702.html,ng.annotation 包https://www.doczj.com/doc/7918117702.html,ng.annotation 中包含所有已定义或自定义注解所需用到的原注解和接口。如接口https://www.doczj.com/doc/7918117702.html,ng.annotation.Annotation 是所有注解继承的接口,并且是自动继承,不需要定义时指定,类似于所有类都自动继承Object。 该包同时定义了四个元注解; Spring自动装配与扫描注解代码详解 1 javabean的自动装配 自动注入,减少xml文件的配置信息。 ? 1 2 3 4 5 6 7 8 9 10 11 12 13 14 15 16 17 18 19 20 spring注解使用规范
spring框架的注解
spring注解的学习
java注解详解
Spring自动装配与扫描注解代码详解