Table Of Contents Pg. #
1.Installation (2)
2.Quick Access Menu: (2)
3.Default Settings (3)
4.Steps Required for Each Capture (10)
5.Output Options (11)
6.Capture Active Window [Alt+PrtSc] (17)
7.Capture Window or Object [Shift+PrtSc] (18)
8.Capture Rectangular Region [Ctrl+PrtSc] (20)
9.Capture a Freehand Region [Shift+Ctrl+PrtSc] (21)
10.Capture a Full Screen [PrtSc] (23)
11.Capture a Scrolling Window [Ctrl+Alt+PrtSc] (24)
12.Capture a Fixed Region [Ctrl+Shift+Alt+PrtSc]: (26)
13.Screen Recorder (27)
14.Run FastStone Capture when Windows Starts (30)
15.FastStone Capture’s Capture Panel (31)
16.Image Editor and Draw Tool (32)
17.Hotkeys (45)
18.Capture an Image from a Slide Show that is Running (46)
19.Convert Images to a PDF File (47)
20.Acquire Images from Scanner (47)
21.The Screen Magnifier (49)
22.The Color Picker (49)
23.Screen Ruler (50)
5.1
A.Source:
1.You can install FastStone Capture from the FastStone Web site by using your web browser to go to
the FastStone Web site (https://www.doczj.com/doc/8517564621.html,) and by navigating to and clicking on the FastStone
Screen Capture Download button
B.Install:
1.Follow the simple on-screen instructions to install FastStone Capture
2.An icon will automatically be placed on your desktop during the installation process
A.Introduction:
1.In most cases, this tutorial assumes that you will use the icons or the keyboard shortcuts to access the
various features and options
2.There is another way to access the features and options - the Quick Access Menu
B.Access the Quick Access Menu:
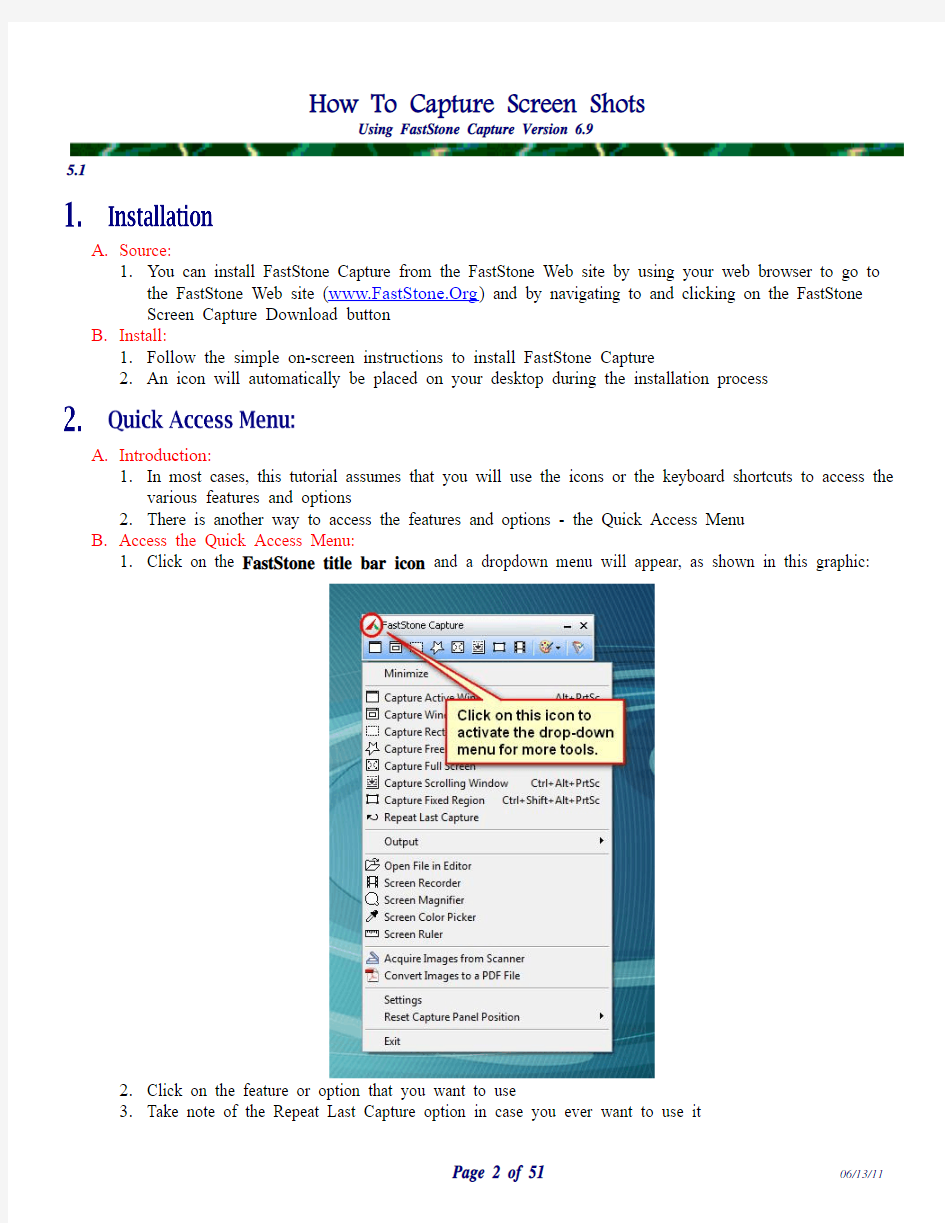
1.Click on the FastStone title bar icon and a dropdown menu will appear, as shown in this graphic:
2.Click on the feature or option that you want to use
3.Take note of the Repeat Last Capture option in case you ever want to use it
5.1
A.Introduction:
1.If you are in a hurry to get started using FastStone Capture, you can skip this section completely and
come back to it later if you have questions about the various default settings
2.In this section of this tutorial, I will show how to open the Settings dialog box, and I will give a brief
explanation of each of the categories of settings
B.Open the Settings dialog box:
1.Activate FastStone Capture, if it is not already active:
a.Double click on the FastStone Capture icon on your desktop:
(1)The FastStone Capture icon will appear in your System Tray
(2)The Capture Panel will appear on your desktop:
(a)Your Capture Panel may have some additional icons if you have already changed the
default settings
(b)I will discuss each of the icons on the Capture Panel as each one is used in this tutorial
2.Open the Settings dialog box:
a.Click on the Settings icon on the Capture Panel and a dropdown menu will appear
b.Click on Settings and the Settings dialog box will appear – it should look something like this:
c.Notice that there are tabs for each type of setting
5.1C.View and/or Change the Settings:
1.Introduction:
a.As you can see from looking at the tabs in the graphic shown above, there are seven different
sets of Settings – just click on the applicable tab to open the applicable settings window
b.In this section, I will discuss each set of Settings
2.The Capture settings:
a.These are the settings that control some of FastStone Capture’s basic functions
b.The various options seem to be self-explanatory
c.Most people will not need to change any of these default settings
d.Those who use FastStone Capture quite often and would like FastStone Capture to run
minimized when Windows starts, can accomplish that by checking the first two checkboxes in
this section
e.For the purposes of this tutorial, I have accepted the default settings in this section, as show in
the graphic shown above
5.1 3.The Hotkey settings:
a.FastStone Capture can be used by clicking with your mouse rather than by using the Hotkeys, so
don’t get hung up on the concept of Hotkeys at this time.
b.In the main section of this tutorial, I will describe how to use FastStone Capture without using
Hotkeys.
c.In a separate section of this tutorial (near the end) I will cover the use of Hotkeys
d.Most users will never have to change any of the Hotkey settings
5.1 4. The Filename settings:
a.This section determines the default Filename that FastStone Capture will use when you save your
captured image as a file
b.The options that are available in this section are quite comprehensive - you can even create your
own “presets”
c.Most people can just accept the default setting that looks like this:
(1)The File Name settings window explains what the symbols means
(2)You can click on the dropdown arrow at the right end of the Filename box to select from a
list of templates - If you do not create and save your own templates, only two choices will be
presented
(3)You can click on the button to create your own presets
(4)You can also create your default filename by typing your entry directly in the Filename
Template box:
(a)For example, I have typed “My Capture ###” in the Filename Template box - it looks like
this:
(b)Now, each time that I use FastStone Capture to save a captured image, the file’s name
will be My Capture 001 et seq. (the number will increase by 1 each time I capture a new
image)
5.1 d.For the purposes of this tutorial, I will assume that you have accepted the default setting which
will result in a filename that uses the current year, month, day, and time (hour, minute and
second) - for example: If the capture is done on August 31, 2008, at 10:30 and 22 seconds, the
file name would be 2008-08-31_103022 - this file naming method will result in a unique name
for each file so there is no need to use a numbering sequence
5.The Auto Save settings:
a.These settings will be used whenever you use FastStone Capture’s Auto Save option (the Auto
Save option will be covered shortly)
b.If you do not make any changes to these settings:
(1)The first time that you use the Auto Save option, you will be asked to complete the
information in this section
(2)If you subsequently use the Auto Save option again at a later time, the information that you
supplied the first time will be used automatically
(3)If you want to subsequently change the Auto Save settings, you will have to come to this
section to accomplish that
(4)I will assume that no changes have been made to this section and I will cover how to make
the changes when we get to the section of this tutorial that covers the Auto Save option
5.1
6.The FTP settings:
a.These settings should be used if you intend to output your captures to the Web (FTP)
b.For the purposes of this tutorial, I have not made any changes or additions to these settings
7.The Editor settings:
a.I will cover the Editor in a separate section of this tutorial
b.For now, just accept the default settings
5.1 c.The Miscellaneous settings window includes four sets of settings:
d.The Clipboard/Word/PowerPoint setting:
(1)If you select this option, any time that you tell FastStone Capture to put the saved capture
into the Clipboard, Word or PowerPoint, the capture will be automatically converted to 256
colors
e.The Screen Recorder settings:
(1)This section merely provides a note stating that can set the options for the Screen Recorder
when you activate this feature
(2)You will be able to make changes to the Screen Recorder options when you open the Screen
Recorder
(3)I will cover the Screen Recorder in a separate section of this tutorial
f.The Screen Magnifier settings:
(1)I will cover the Screen Magnifier in a separate section of this tutorial
(2)For now, just accept the default settings
5.1g.The Screen Color Picker settings:
(1)I will cover the Screen Color Picker in a separate section of this tutorial
(2)For now, just accept the default setting
Note:This section does not apply to the Screen Recorder which is covered in a separate section called Screen Recorder
A.Activate FastStone Capture
B.Display the item to be captured on your monitor
C.Select the Output option:
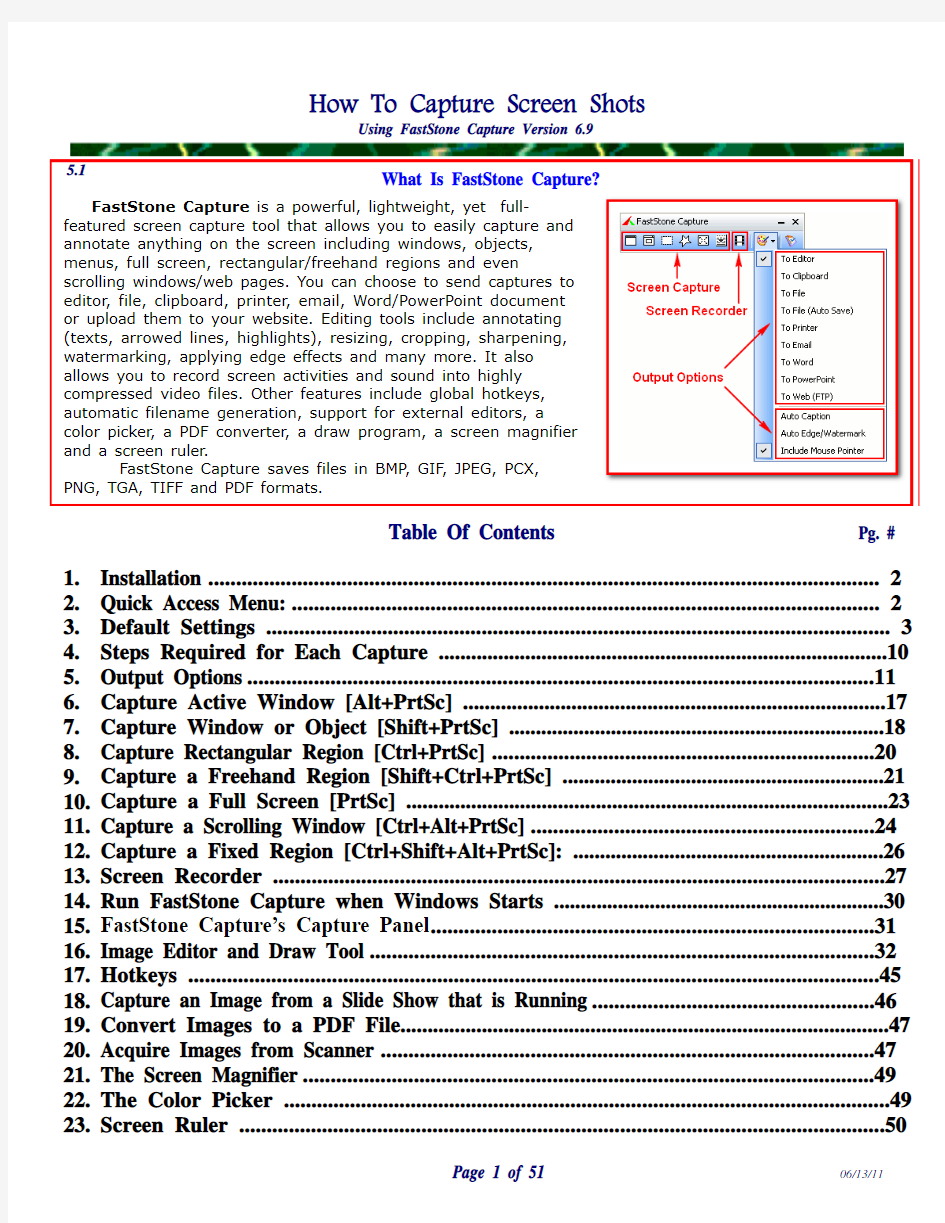
1.FastStone Capture provides the following Output options:
a.To Editor (FastStone Capture image editor)
b.To Clipboard (Microsoft Windows Clipboard)
c.To File
d.To File (Auto Save)
e.To Printer
f.To Email
g.To Word
h.To PowerPoint
i.To Web (FTP)
2.The Output Options section of this tutorial covers each of these Output options in detail
D.Select the Type of Capture:
1.FastStone Capture provides the following Types of Captures (I have included the Keyboard Shortcut
Keys for future reference):
a.Capture Active Window [Alt+PrtSc]
b.Capture Window or Object [Shift+PrtSc]
c.Capture Rectangular Region [Ctrl+PrtSc]
d.Capture Freehand Region [Ctrl+Shift+PrtSc]
e.Capture Full Screen [PrtSc]
f.Capture Fixed Region [Ctrl+Shift+Alt+PrtSc]
g.Capture Scrolling Window [Ctrl+Alt+PrtSc]
h.There is a separate section in this tutorial for each of these Types of Captures
E.Make the Capture:
1.Depending upon the Type of Capture that you select, the capture steps will differ
2.Refer to the applicable section of this tutorial for the steps needed for each Type of Capture
5.1
A.Introduction:
1.You select an Output option to tell FastStone Capture what you want to be done with the image that
you are about to capture
2.Each time that you use FastStone Capture the Output option that was you last used will be used
again, unless you select a new Output option
3.This section will give a brief explanation of each Output option
B.How to select an Output option:
1.Open FastStone Capture if it is not already open
2.Introduction:
a.The Output icon is next to the last icon on the right end of the FastStone Capture Control Panel
b.The Output icon reflects the Output option that was last used, so the Output icon can be any
one of nine icons
c.If you want to use the same Output Option that you used the last time that you used FastStone
Capture, there is no need to change the Output Option
d.If you want to change to a different Output Option, proceed to the next section
3.If you want to designate a different Output Option:
a.Click on whichever Output icon is displayed and a dropdown menu will appear – it will look like
this:
b.Click on one of the nine Output options to select it and the Output icon on the toolbar will reflect
your choice
c.The next nine sections of this tutorial describe each of these Output
d.In addition to the nine Output Options, there are four additional Capture settings that appear at
the bottom of the dropdown menu (see graphic above) :
(1)Auto Caption:
(a)The Caption function is fully described in the section of this tutorial that covers the
FastStone Editor
(b)If you turn this setting on, it will allow you to automatically apply a caption to each
capture without the need to open the capture in the FastStone Editor
5.1(2)Auto Edge/Watermark:
(a)The Edge/Watermark function is fully described in the section of this tutorial that covers
the FastStone Editor
(b)If you turn the Auto Edge/Watermark setting on, it will allow you to automatically apply
an Edge and/or a Watermark to each capture without the need to open the capture in the
FastStone Editor
(3)Include Mouse Pointer:
(a)If you turn this setting on, the Mouse Pointer will be included in the capture, provided
that the pointer is located within the capture area
(b)This option works best when the capture is originated by the use of Hotkeys
(4)Preview in Editor:
(a)If you turn this setting on, the capture will always open in the Editor so that you can
make changes to the capture before the selected Output Option is completed
(b)When applicable, the first icon on the Toolbar in the Editor will reflect your Output
Option - just click on that icon to complete the execution of the Output Option that you
selected
C.To Editor (FastStone Capture image editor) :
1.FastStone Capture has a built-in image editing function
2.If you select this option, the captured image will open in the FastStone Capture Editor
3.I will cover the FastStone Capture Image Editor in detail in a later section of this tutorial
D.To Clipboard (Microsoft Windows Clipboard) :
1.If you select this option, the captured image will be placed in the Windows clipboard
2.If you want you would like the capture to open in the FastStone Capture Editor before it is saved to
the Windows clipboard, select the Preview In Editor option at the bottom of the Output Options
dropdown menu
3.If you want to limit the number of colors in the capture to 256 colors, select this option under the
Others tab in the Clipboard/Word/PowerPoint section of the Settings dialog box
4.After the capture has been placed in the Windows clipboard, you can use the Paste command to
paste the capture into a document (but not into Outlook Express)
E.To File :
1.This Output option saves the captured image as a file on your hard disk
2.If you want you would like the capture to open in the FastStone Capture Editor before it is saved,
select the Preview In Editor option at the bottom of the Output Options dropdown menu
3.When the To File Output option is in effect, each time you do a capture the Save As dialog box will
appear and you will need to:
a.Navigate to the folder into which you would like to save the captured file
b.Designate an Object Name:
(1)FastStone Capture assigns an Object Name based on information that is in the program’s
Settings - the default setting provides an Object Name which is based on the date and the
time of the capture
(2)You can change the file name by typing a new name in the Object Name box
c.Designate a Save As Type:
(1)The default file type is PNG (Portable Networks Graphic) which is a format that is
recognized by many programs, but we will use JPG
5.1(2)Change the Save As Type to JPG:
(a)Click on the dropdown arrow at the right end of the Save As Type box and a dropdown
menu will appear
(b)Click on JPEG Format (JPG) to select that option
(c)Once you change the Save As Type to a different format, FastStone Capture will
remember that preference and will default to that file type the next time you use the
program
d.Click on the Save button to save the capture file to your hard disk
F.To File (Auto Save) - includes an option to send the captured image to the Windows Clipboard:
1.This Output option saves the image as a file on your hard disk, just as the other To File option does,
however, there are some differences:
a.The first time that you select the To File (Auto Save) option, FastStone Capture:
(1)Will display the following Information box:
telling you that you need to specify a valid Output Folder
(2)Click on the OK button and the Settings dialog box will appear:
(a)The Auto Save section of the Settings dialog box will look like this:
1.Designate the Output Format:
a.The default file type is PNG (Portable Networks Graphic) which is a format that
is recognized by many programs, but we will change the format to JPG:
i.Click on the dropdown arrow at the right end of the Output Folder box
and a dropdown menu will appear will appear
ii.Click on JPG Output Format to select that option
2.Designate the Output Folder:
a.Click on the Ellipsis button at the right end of the Output Folder box to
navigate to the desired folder or to create a new folder - we will select the My
Documents folder
3.If you want FastStone Capture to send the captured image to the Windows Clipboard,
in addition to saving the file on your hard disk:
a.Click on the Copy To Clipboard checkbox to select this option
b.When this box is checked the image will be saved to your hard disk and it will
also be placed in the Windows Clipboard
5.1 4.If you want the captured image to open automatically in an External Program (Such
as Photoshop Elements),:
a.Click on the Open in External Program checkbox to
select this option, and the External Program box
will appear
b.Click on the Ellipses at the right end of the External Program box and the
Open dialog box will appear
c.Navigate to the executable file of the program that you want to designate at the
External Program and select it - the following graphic indicates that I have
designated the Editor of Photoshop Elements 5 as the External Editor:
d. I will leave the Open In External Program option unchecked
(b)The Filename section of the Settings dialog box contains the Filename template that will
be used when the file is saved:
1.It should look something like this:
2.FastStone Capture will use the information in this section to determine the name that
will be given to the file:
a.See the Default Settings section of this tutorial for more information about the
Filename section of the Settings dialog box
b.If you want to change this information, you can do so now
c.If you do change the information, FastStone Capture will apply the changes each
time you use either the To File or To File (Auto Save) option
(c)Click on the OK button on the Settings dialog box to close the box and accept the
changes
b.The next time that you use the To File (Auto Save) option, FastStone Capture will use the
information on the Settings dialog box to:
(1)Assign a name to the file
(2)Determine what Output Format will be used
(3)Determine which folder to use
(4)Determine whether or not the file is also sent to the Windows Clipboard
(5)Determine if the captured image will automatically open in an External Editing program - we
did not select the Open In External Program option
c.If you subsequently want to change any of these settings, and you need a bit of help, refer to the
Default Settings section of this tutorial
2.If you want you would like the capture to open in the FastStone Capture Editor before it is saved,
select the Preview In Editor option at the bottom of the Output Options dropdown menu
5.1
G.To Printer :
1.This Output option sends the image to your printer
2.If you want you would like the capture to open in the FastStone Capture Editor before it is printed,
select the Preview In Editor option at the bottom of the Output Options dropdown menu
3.When the To Printer Output option is in effect, each time you do a capture the Print dialog box will
appear - it will look something like this:
a.The settings on the Print dialog box are rather basic
b.The settings that are changed most often are the Size and the Orientation
4.After you are happy with the settings, click on the Print button to print the image
H.To Email :
1.Introduction:
a.This option will sends the image to your email program if that program is supported by the
Windows Mailto: command
b.If the email program that you use is not supported by the Windows Mailto: command, you will
need to first save the captured image and then attach it to, or insert it into, a message
2.If you want you would like annotations on the image that was captured, you can open FastStone
Draw after the Email window opens and before you send the message by clicking on the Draw
button in the Email window.
3.When the To Email Output option is in effect, each time you do a capture the Email dialog box will
appear - it will look something like this:
5.1 4.If you are satisfied with the image that appears in the Email dialog box, click on the Send Email
button and your default email program will open and the captured image will be attached
I.To Word :
1.When you use the To Word Output option:
a.If you have a Word document open, the image that is captured will be inserted at location of your
cursor in your Word document
b.If you do not have Word open, FastStone Capture will open Word and will insert the captured
image at the beginning of a new Word document
2.However, if you also have Preview in Editor selected in the Output Options, the capture will open in
the FastStone Editor and a new Finish (Word) icon will appear as the first icon on the
Editor’s toolbar - it replaces the Save As icon that usually appears as the first icon on the
Editor’s toolbar:
3.After you are finished using the FastStone Editor, click on the Finish Word icon and the
captured image will be inserted in your Word document at the location of the blinking cursor. If
Word is not open, FastStone Capture will open it and will insert the captured image at the beginning
of a new Word document.
4.If you want to limit the number of colors in the capture to 256 colors, select this option in the
Clipboard/Word/PowerPoint section of the Settings dialog box
5.I will cover the FastStone Capture Image Editor in a later section of this tutorial
J.To PowerPoint :
1.When you use the To PowerPoint Output option:
a.If you have a PowerPoint document open, the image that is captured will be inserted at location
of your cursor in your PowerPoint document
b.If you do not have PowerPoint open, FastStone Capture will open PowerPoint and will insert the
captured image at the beginning of a new PowerPoint document
2.However, if you also have Preview in Editor selected in the Output Options, the capture will open in
the FastStone Capture Editor
3.This is the same thing that would have happen if you had selected the To Editor Output option,
however, when you select the To PowerPoint Output option, a new Finish PowerPoint icon
appears as the first icon on the Editor’s toolbar - it replaces the Save As icon
that usually appears as the first icon on the Editor’s toolbar:
4.When you click on the Finish PowerPoint icon the captured image will be inserted
on the active slide in PowerPoint. If PowerPoint is not open, FastStone Capture will open it and will
insert the captured image on the first slide.
5.1 5. If you want to limit the number of colors in the capture to 256 colors, select this option in the
Clipboard/Word/PowerPoint section of the Settings dialog box
6. I will cover the FastStone Capture Image Editor in a later section of this tutorial
A. Introduction:
1. The Windows operating system allows you to have multiple windows open at the same time
2. This Capture option captures the visible portion of the Active window
B. Display the Active Window that you want to capture:
1. Open the Window that you want to capture, if it is not already open
2. Click on the Window that you want to capture to make it the active window, if it is not already the active window
3. Resize the Window, if necessary, so that the whole Window is visible (or so that the portion of the Window that you want to capture is visible)
C. Activate FastStone Capture, if it is not already active :
1. Double click on the FastStone Capture icon on your desktop:
a. The FastStone Capture icon will appear in your System Tray
b. The Capture Panel will appear on your desktop
D. Select the Output Option that you want to use, if it is not already selected :
1. FastStone Capture will use the Output Option that you used the last time that you used FastStone Capture:
a. You can tell which Output Option was used the last time by looking at the Output Option icon - it will look like one of these: (a) To Editor icon
(b) To Clipboard icon
(c) To File icon (d) To File (Auto Save) icon
(e) To Printer icon
(f) To Email icon
(g) To Word icon (h) To PowerPoint icon
(i) The developer of FastStone Capture has outdone himself this time!!!
b. If you do not want to change the Output Option, skip the next step
5.1 2.If you want to change the Output Option, click on the active Output Option icon on the Capture
Panel and a dropdown menu will appear:
a.Click on the Output Option that you want to use
b.FastStone Capture will remember the Output Option that you choose and will automatically use
that Output Option until you change the Output Option
E.Make the Capture using the Active Window option:
1.Select the Capture the Active Window option by either:
a.Clicking on the Capture Active Window icon on the Capture Panel, or
https://www.doczj.com/doc/8517564621.html,ing the Keyboard shortcut [Alt+PrtSc]
2.FastStone Capture will capture the visible portion of the active window
3.Depending on the Output Option that you selected, the capture process could be complete or addition
steps may be required - If you need help completing the capture process, refer to the Output Options
section of this tutorial
A.Introduction:
1.The windows that are displayed on your monitor may be comprised of a multiple number of objects
2.This Capture option make it easy to capture the visible portion of:
a.An entire window, or
b.An object that is part of a window
B.Display the Window/Object that you want to capture:
1.Open the Window/Object that you want to capture, if it is not already open
2.Make sure that the portion of the Window/Object that you want to capture is visible on your monitor
C.Activate FastStone Capture, if it is not already active:
1.Double click on the FastStone Capture icon on your desktop:
a.The FastStone Capture icon will appear in your System Tray
2.The Capture Panel will appear on your desktop
D.Select the Output Option that you want to use, if it is not already selected:
1.FastStone Capture will use the Output Option that you used the last time that you used FastStone
Capture:
a.You can tell which Output Option was used the last time by looking at the Output Option icon -
it will look like one of these:
(a)To Editor icon
(b)To Clipboard icon
(c)To File icon
(d)To File (Auto Save) icon
(e)To Printer icon
(f)To Email icon
5.1
(g)To Word icon
(h)To PowerPoint icon
(i)The developer of FastStone Capture has outdone himself this time!!!
b.If you do not want to change the Output Option, skip the next step
2.If you want to change the Output Option, click on the active Output Option icon on the Capture
Panel and a dropdown menu will appear:
a.Click on the Output Option that you want to use
b.FastStone Capture will remember the Output Option that you choose and will automatically use
that Output Option until you change the Output Option
E.Make the Capture using the Window/Object option:
1.Select the Capture Window/Object option by either:
a.Clicking on the Capture Window/Object icon on the Capture Panel, or
https://www.doczj.com/doc/8517564621.html,ing the Keyboard shortcut [Shift+PrtSc]
c.You can cancel the selection option by pressing the Escape key E
2.FastStone Capture will place a red box around a window or object
3.Move the cursor around on the screen and you will see the red box jump around so that it surrounds
the window or object that is under the cursor
4.When the red box is surrounding the window or object that you would like to capture, just click and
depending on the Output Option that you selected, the capture process could be complete or addition steps may be required - If you need help completing the capture process, refer to the Output Options
section of this tutorial
F.Capture multiple Window(s)/Objects:
1.Introduction:
a.FastStone Capture now allows you select and capture multiple window(s)/Objects in the same
capture
b.This lets us to capture more than one window in a single capture, as well as multiple objects such
as multi-level menus
c.This process requires the use of keyboard shortcut keys
2.Here is how it is done – follow these steps carefully:
a.Display all of the windows or objects that you want to capture on your monitor
b.Initiate the capture by holding down the Shift key and pressing the PrtSc key
https://www.doczj.com/doc/8517564621.html,e the cursor to point to the first window/object that you want to capture – a red outline will
appear around the window/object – do not click on the window/object yet
d.Press and hold down the Ctrl key (hold it down until I tell you to let it go)
e.Click on the first window/object that you want to capture and it should turn black
f.Are you still holding down the Ctrl key?
g.Click on the second window/object that you want to capture (while still holding down the Ctrl
key) and it will also turn black
h.Repeat this procedure until you have finished selecting the windows/objects that you want to
capture
i.Now you can let go of the Ctrl key!!!
j.To make the capture, press the Enter key, and depending on the Output Option that you selected, the capture process could be complete or addition steps may be required - If you need help
completing the capture process, refer to the Output Options section of this tutorial
5.1
A.Introduction:
1.This Capture option make it easy to capture any rectangular region that is visible on your monitor
B.Display the Rectangular Region that you want to capture:
1.Make sure that the rectangular region that you want to capture is visible on your monitor, if it is not
already visible
C.Activate FastStone Capture, if it is not already active:
1.Double click on the FastStone Capture icon on your desktop:
a.The FastStone Capture icon will appear in your System Tray
b.The Capture Panel will appear on your desktop
D.Select the Output Option that you want to use, if it is not already selected:
1.FastStone Capture will use the Output Option that you used the last time that you used FastStone
Capture:
a.You can tell which Output Option was used the last time by looking at the Output Option icon -
it will look like one of these:
(a)To Editor icon
(b)To Clipboard icon
(c)To File icon
(d)To File (Auto Save) icon
(e)To Printer icon
(f)To Email icon
(g)To Word icon
(h)To PowerPoint icon
(i)The developer of FastStone Capture has outdone himself this time!!!
b.If you do not want to change the Output Option, skip the next step
2.If you want to change the Output Option, click on the active Output Option icon on the Capture
Panel and a dropdown menu will appear:
a.Click on the Output Option that you want to use
b.FastStone Capture will remember the Output Option that you choose and will automatically use
that Output Option until you change the Output Option
E.Make the Capture using the Rectangular Region option:
1.Select the Capture Rectangular Region option by either:
a.Clicking on the Capture Rectangular Region icon on the Capture Panel, or
https://www.doczj.com/doc/8517564621.html,ing the Keyboard shortcut [Ctrl+PrtSc]
c.You can cancel the selection option by pressing the Escape key E
2.FastStone Capture will display:
a.The Selection crosshairs , and
b.The Preview box