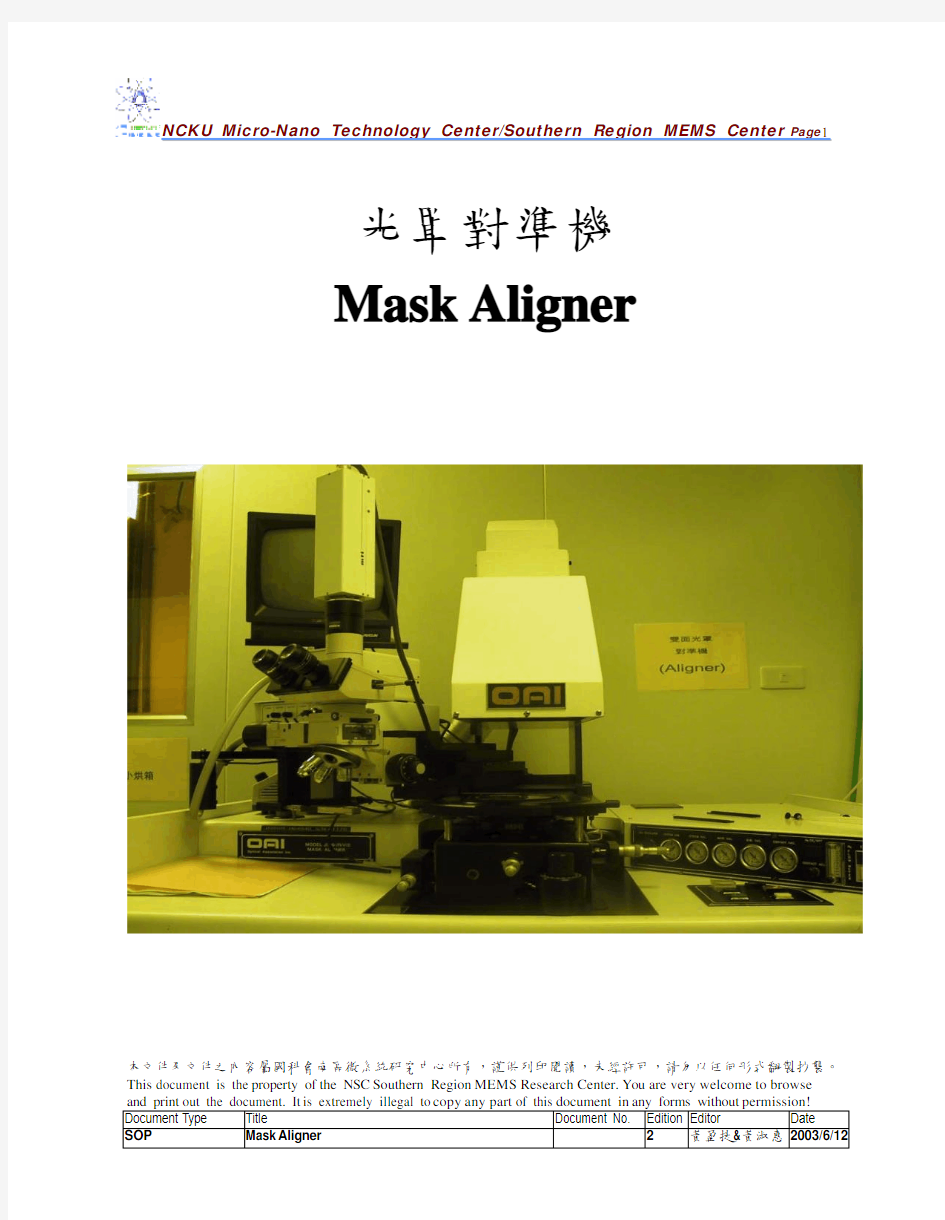
光罩對準機
Mask Aligner
本文件及文件之內容屬國科會南區微系統研究中心所有,謹供列印閱讀,未經許可,請勿以任何形式翻製抄襲。This document is the property of the NSC Southern Region MEMS Research Center.You are very welcome to browse
and print out the document. It is extremely illegal to copy any part of this document in any forms without permission! Document Type Title Document No.Edition Editor Date SOP Mask Aligner2黃盈捷&黃淑惠2003/6/12
目錄
1.0微影製程原理 (3)
1.1前言 (3)
1.2原理 (3)
1.3微影流程示意圖 (6)
2.0儀器介紹 (7)
2.1電源供應器面板示意圖 (8)
2.2使用前檢查 (9)
3.0操作步驟介紹 (10)
3.1單面曝光操作步驟 (10)
3.2雙面曝光操作步驟 (15)
3.3關機步驟 (16)
4.0設備維護及狀況處理 (17)
4.1狀況處理 (17)
5.0廠商資料 (18)
6.0參考文獻 (18)
本文件及文件之內容屬國科會南區微系統研究中心所有,謹供列印閱讀,未經許可,請勿以任何形式翻製抄襲。This document is the property of the NSC Southern Region MEMS Research Center.You are very welcome to browse
and print out the document. It is extremely illegal to copy any part of this document in any forms without permission! Document Type Title Document No.Edition Editor Date SOP Mask Aligner2黃盈捷&黃淑惠2003/6/12
1.0微影製程原理
1.1前言:
微影(Photolithigraphy)可說是半導體製程和微機電製程中舉足輕重的步驟之一,凡是與結構﹑圖案相關的,如:各薄膜圖案、雜質區域均由微影步驟所決定。因此微影次數與所需光罩層數可用來表示此製程之難易程度。
整個微影製程包含了三大步驟—塗佈光阻、曝光、顯影;但是每個步驟之間的連接還包含了去水烘烤(D e h y d r a t i o n)、塗底(P r i m i n g)、軟烤(S o f tB a k e)、和硬烤(H a r d B a k e)等步驟。使的微影製程的複雜性明顯提升,每一道製程都顯得相當重要。因為每一項製程都有著牽一髮則動全身的重要性,關係著整個微影製程的成敗。
1.2原理:
整個微影的製程有塗底(Priming)(如HMDS)、上光阻(Coating Photoresist)、軟烤(Soft Bake)、曝光(Exposure)、顯影(Development)和硬烤(Hard Bake)等步驟。
塗底:上光阻前在晶片表面塗上一化合物,此步驟為塗底,藉由適當塗底晶片表面之表面能將被調整到與光阻表面能相當之程度,因此光阻對晶片表面的
附著力便可增強。
光阻塗佈:將光阻塗佈於晶片表面的方法很多,最廣為使用的方法為旋轉塗佈法,將定量光阻施佈於晶片中心,再藉由二階段不同轉速、時間使光阻均勻塗佈本文件及文件之內容屬國科會南區微系統研究中心所有,謹供列印閱讀,未經許可,請勿以任何形式翻製抄襲。This document is the property of the NSC Southern Region MEMS Research Center.You are very welcome to browse
and print out the document. It is extremely illegal to copy any part of this document in any forms without permission! Document Type Title Document No.Edition Editor Date
SOP Mask Aligner2黃盈捷&黃淑惠2003/6/12
於晶面表面。
軟烤:或稱曝光前烘烤,主要用來將光阻殘留溶劑去除,增加光阻對晶片之附著力。
亦可提升非照射區與照射區光阻之顯影速率比和降低光阻內部應力。
曝光:曝光之目的在使晶片表面所覆光阻吸收適當能量以進行光化轉換,如此顯影後光阻才能成功且正確地轉移光罩上之圖形至晶片上。而曝光主要操作條件為:
光源強度及曝光時間,決定此兩條件之步驟為光阻厚度、軟烤程度、顯影條
件和顯顥後光阻線寬容許誤差等。圖形轉移至晶片表面可分為以下幾種:
(1)接觸法:解析度最佳,但光罩易磨損。
(2)鄰近法:光罩與晶片有10-20 m之間隙,無晶片磨損困擾,工業界
大多採用此法。
(3)投影法:光罩與晶片間有數公分距離,利用透鏡將光罩上之圖案縮小,聚
焦後將影像投射至晶片上。
(4)不需光罩之直寫法:不需光罩,直接將圖形寫於覆有光阻之晶片上,
其光源有電子束、聚焦離子束與雷射光等。
顯影:當光阻被照後,會改變原有化學性質,使照射區與非照射區在顯影液中溶解速率有極大差別,顯影液則將易分解區域溶解,達到將圖形顯影出來之
本文件及文件之內容屬國科會南區微系統研究中心所有,謹供列印閱讀,未經許可,請勿以任何形式翻製抄襲。
This document is the property of the NSC Southern Region MEMS Research Center.You are very welcome to browse
and print out the document. It is extremely illegal to copy any part of this document in any forms without permission!
Document Type Title Document No.Edition Editor Date
SOP Mask Aligner2黃盈捷&黃淑惠2003/6/12
目的。其影響之參數有顯影時間、濃度和溫度。
硬烤:硬烤不僅可移除殘留在光阻內之顯影液與清潔液,更可提高抗蝕刻能力、和晶片之附著力、減少晶片產生之針孔(Pin Hole)現象及增加平坦度。
本文件及文件之內容屬國科會南區微系統研究中心所有,謹供列印閱讀,未經許可,請勿以任何形式翻製抄襲。
This document is the property of the NSC Southern Region MEMS Research Center.You are very welcome to browse
and print out the document. It is extremely illegal to copy any part of this document in any forms without permission! Document Type Title Document No.Edition Editor Date
SOP Mask Aligner2黃盈捷&黃淑惠2003/6/12
1.3微影流程示意圖
整個微影製程流程如下
去水烘烤塗底
上光阻去水烘烤目的為去除水分子,溫度多為100°C ~200°C 都可。
塗底目的是未了提升光組和晶片表面的附著性,一般採用H M D S ,先採用一組多人
使用的參數。見附表
根據設計的不同有正負光阻,中心有提供S 1818正光阻供使用。軟烤的目的為去除光阻中的溶劑,增加光阻對晶片的附著能力;時間和溫度的控
制是關鍵,如果光阻厚度固定,實驗目的為找出一組最佳時間和溫度關係。
曝光為本次實驗的重點,針對不同線寬進行曝光,主要控制參數為曝光光源強度
和進行曝光時間。
目的為減輕駐波現象,通常溫度會比軟烤高。當線寬很小時此步驟也為重點。硬烤中段製程一般控制顯影的因素有顯影時間、顯影劑的濃度及溫度等。
中心備有S 1818正光組的顯影液351
硬烤主要目的為加強光阻附著性幫助光阻在後續製程中的表現,視時間而定。繼續後面的鍍膜或蝕刻製程
本文件及文件之內容屬國科會南區微系統研究中心所有,謹供列印閱讀,未經許可,請勿以任何形式翻製抄襲。This document is the property of the NSC Southern Region MEMS Research Center.You are very welcome to browse and print out the document. It is extremely illegal to copy any part of this document in any forms without permission!Document Type Title Document No.Edition Editor Date SOP Mask Aligner 2黃盈捷&黃淑惠2003/6/12
2.0儀器介紹
外觀介紹
螢幕開關
顯微鏡開關
光圈
汞燈電源供應器本文件及文件之內容屬國科會南區微系統研究中心所有,謹供列印閱讀,未經許可,請勿以任何形式翻製抄襲。
This document is the property of the NSC Southern Region MEMS Research Center.You are very welcome to browse and print out the document. It is extremely illegal to copy any part of this document in any forms without permission!
Document Type Title Document No.Edition Editor Date SOP Mask Aligner2黃盈捷&黃淑惠2003/6/12
2.1電源供應器面板示意圖
A B C
E
A:電流輸出顯示錶(電流6.5A為穩定輸出)
B:功率輸出顯示錶(功率350W為穩定輸出)C:
START鍵(下壓2秒後,A與B的指針會上升)D:
電源開關(往上為ON,往下為OFF)E:電源輸出模式
(請確定模式為C/P模式)
C/I為constant intensity,即輸出intensity固定,因此隨汞燈使用時間愈久,其功率會一直持續上升,若功率超過400W對機台會有損傷。因此不建議使用。
C/P為constant power,,即輸出功率固定為350W。因此每次曝光前應使用power
meter量測所需曝光時間。
本文件及文件之內容屬國科會南區微系統研究中心所有,謹供列印閱讀,未經許可,請勿以任何形式翻製抄襲。
This document is the property of the NSC Southern Region MEMS Research Center.You are very welcome to browse
and print out the document. It is extremely illegal to copy any part of this document in any forms without permission! Document Type Title Document No.Edition Editor Date
SOP Mask Aligner2黃盈捷&黃淑惠2003/6/12
2-2
使用前檢查1
電源供應器若為關閉狀態,檢查簽到簿中上一位使用者使用時間,距現在是否已超過1小時。需超過1小時才可在開啟電源供應器。2檢查風扇是否打開,並到黃光室外檢查風扇是否正常運轉。3電源供應器開啟後,確定電源供應器的Mode 為Mode C/P 模式。
(C/P 為constant power ,即電源供應器固定輸出功率350W ,但隨汞燈使用期限增加、壽命簡短,汞燈的intensity 會降低,因此每次曝光前需使用power meter
量
測目前汞燈能量,計算曝光時間。)4打開機器右側邊的N 2閥門,檢查最左邊壓力表『SYSTEM CDA 』指針是否接
近藍線或在藍線上。
風扇開關風扇N 2閥門
真空閥門SYSTEM
CDA SYSTEM VAC.
本文件及文件之內容屬國科會南區微系統研究中心所有,謹供列印閱讀,未經許可,請勿以任何形式翻製抄襲。This document is the property of the NSC Southern Region MEMS Research Center.You are very welcome to browse and print out the document. It is extremely illegal to copy any part of this document in any forms without permission!Document Type Title Document No.Edition Editor Date SOP Mask Aligner 2黃盈捷&黃淑惠2003/6/12
3.0操作步驟介紹
3.1單面曝光操作步驟
1.以power meter量測目前汞燈能量,並計算曝光時間。
(1)打開power為ON,選擇操作模式為NORMAL。
(2)選擇要量測之波長(有365nm及400nm兩種)。
(3)將光感測器置於圓形基座上,量測中心點與放射狀的8點,取9點的能量
平均值,用來計算曝光時間。
(曝光時間依所選用之光阻的特性及厚度而有所不同,例如,S1818對365nm波長
較為敏感。)
舉例:polyimide7020對400nm較為敏感,塗佈25 m須100mJ/cm2的能量,若以power meter量測其能量平均值為15mW/cm2,則所需曝光時間為
100/15=6.7秒。
Power meter:能量顯示
光感測器
波長選擇
Power
操作模式選擇normal
本文件及文件之內容屬國科會南區微系統研究中心所有,謹供列印閱讀,未經許可,請勿以任何形式翻製抄襲。
This document is the property of the NSC Southern Region MEMS Research Center.You are very welcome to browse
and print out the document. It is extremely illegal to copy any part of this document in any forms without permission! Document Type Title Document No.Edition Editor Date
SOP Mask Aligner2黃盈捷&黃淑惠2003/6/12
2.放光罩於mask frame上(光罩正面朝下),按操作面板上的mask vacuum吸住光
罩,若為塑膠光罩請在上方多壓一片玻璃,再以壓條固定之。
3.按操作面板上的mask frame open/close,使mask frame升起,放試片於圓形基
座上,按操作面板上之substrate vacuum將試片吸住。
圓形基座
Mask frame
壓條
Mask frame
Open/close
Substrate vacuum Mask vacuum
1.按操作面板上的mask frame open/close,使mask frame放下。
2.按住台邊扭(Ball-Lock Bottom),順時針方向慢慢旋轉升降扭(Z-Knob)使圓形基
座上升,直到感覺傳動皮帶已拉緊即可,放開台邊扭(Ball-Lock Bottom),並將升降扭以逆時針方向旋轉15小刻度。
(每一小格約為5μm,15格為75μm)
(逆時針方向旋轉Z-Knob,目的在避免對準時,試片與光罩會相互摩差而破壞光罩。若不需對準時,可不必逆時針方向旋轉Z-Knob。)
注意:皮帶感覺轉緊後,不要再繼續旋轉
本文件及文件之內容屬國科會南區微系統研究中心所有,謹供列印閱讀,未經許可,請勿以任何形式翻製抄襲。
This document is the property of the NSC Southern Region MEMS Research Center.You are very welcome to browse
and print out the document. It is extremely illegal to copy any part of this document in any forms without permission! Document Type Title Document No.Edition Editor Date
SOP Mask Aligner2黃盈捷&黃淑惠2003/6/12
X
平方
行向
旋調
轉整
角
度
調Z-Knob
整
Ball-Lock Bottom Y方向調整皮帶
3.檢查顯微鏡鏡頭是否在最小倍率,並且已旋轉到最高處。
4.按操作面板上的Cycle,將顯微鏡旋。打開顯微鏡開關、光圈(至1/3處即可),打開
CCD螢幕開關。
5.調整焦距,按壓顯微鏡旁之握把上黑色按鈕,可自由移動顯微鏡位置。或調整圓
形基座位置(右方—X方向調整,下方—Y方向調整,左方—平行旋轉角度
調整,最大角度僅3度)
螢幕開關
光圈
顯微鏡開關
本文件及文件之內容屬國科會南區微系統研究中心所有,謹供列印閱讀,未經許可,請勿以任何形式翻製抄襲。
This document is the property of the NSC Southern Region MEMS Research Center.You are very welcome to browse
and print out the document. It is extremely illegal to copy any part of this document in any forms without permission! Document Type Title Document No.Edition Editor Date
SOP Mask Aligner2黃盈捷&黃淑惠2003/6/12
注意:曝光中請勿眼睛直視汞燈,因為汞燈所發出的波常會對眼睛造成傷害,不宜久視,否則請帶護目鏡
6.將試片夾起進行顯影,可再放另試片於圓形基座上,按substrate vacuum將試
片吸住,再按操作面板上的mask frame open/close,使mask frame放下。重複上述6-9步驟。
7.做完對準後,若不想進行曝光,可按操作面板上的Skip,光源會轉至光罩上方
但不進行曝光。
8.使用S1818光阻者,中心配有1:3與1:4之稀釋後顯影液,請加以重複使用避
免不必要之浪費。以水洗去顯影液後利用加熱板進行硬烤基板。
Skip
Cycle
移調
動整
顯顯
微微
鏡鏡
按焦
鈕距
本文件及文件之內容屬國科會南區微系統研究中心所有,謹供列印閱讀,未經許可,請勿以任何形式翻製抄襲。
This document is the property of the NSC Southern Region MEMS Research Center.You are very welcome to browse
and print out the document. It is extremely illegal to copy any part of this document in any forms without permission! Document Type Title Document No.Edition Editor Date
SOP Mask Aligner2黃盈捷&黃淑惠2003/6/12
3.2雙面曝光操作步驟
1.放光罩、基板、調顯微鏡其步驟同上之1-6步驟。
2.打開紅外線(IR)光源開關(注意:請勿旋超過刻度5)
3.打開顯微鏡開關與CCD螢幕開關(不必開光圈,以免光線相互干擾)
4.按操作面板上的Cycle,將顯微鏡旋至光罩上方。
5.調整焦距,按壓顯微鏡旁之握把上黑色按鈕,可自由移動顯微鏡位置。或調整圓
形基座位置。
6.踩地上之IR腳踏,此時紅外線燈泡發亮,可由CCD螢幕中觀察到基板背面圖形
進行對準。(不需IR光源時,不必採腳踏)
7.對準後,進行曝光、顯影、烘烤,其步驟同上之9-12。
紅外線(IR)光源開
緊急停止扭IR腳踏
本文件及文件之內容屬國科會南區微系統研究中心所有,謹供列印閱讀,未經許可,請勿以任何形式翻製抄襲。This document is the property of the NSC Southern Region MEMS Research Center.You are very welcome to browse
and print out the document. It is extremely illegal to copy any part of this document in any forms without permission! Document Type Title Document No.Edition Editor Date
SOP Mask Aligner2黃盈捷&黃淑惠2003/6/12
3.3關機步驟
1.將基板取出,按操作面板上的mask frame open/close,使mask frame放下。再按
操作面板上的mask vacuum取消光罩的真空,將壓條鬆開取下光罩。
2.關閉顯微鏡開關、光圈(IR光源)、CCD螢幕開關和總開關(OFF)。將氮氣
閥與真空閥關閉。刷卡OFF。
3.將電源供應器的電源切至OFF,關閉牆上之風扇開關。若為白天使用者不必關閉
電源供應器與風扇開關。
注意:電源供應器關閉後需1小時以上方可再開機,請晚上使用者才關閉電源
供應器。
注意:電源供應器關閉後才可關閉風扇開關做完對準後,設定電源旁之曝光時間(紅色數字微小數點下第一位),再按一次按操作面板上的Cycle,光源會
轉至光罩上方進行曝光。(曝光後mask frame會升起,且基板之真空亦會
解除)
本文件及文件之內容屬國科會南區微系統研究中心所有,謹供列印閱讀,未經許可,請勿以任何形式翻製抄襲。
This document is the property of the NSC Southern Region MEMS Research Center.You are very welcome to browse
and print out the document. It is extremely illegal to copy any part of this document in any forms without permission! Document Type Title Document No.Edition Editor Date
SOP Mask Aligner2黃盈捷&黃淑惠2003/6/12
4.0設備維護及狀況處理
4. 1狀況處理
狀況一:按mask frame open/close無法將mask frame升起
處理:檢查面板最左邊的「System CDA」表,指針是否有升起且接近於藍線。若否請檢查N2閥是否打開,若已打開而指針仍未升起,請打電話給技術人員請求打開N2。
狀況二:按Cycle鍵無法將顯微鏡轉至光罩上方
處理一:將mask frame升起以擦拭紙或鋁箔紙墊於A點(感應桿)之上,再按mask frame open/close將擦拭紙或鋁箔紙壓住,此時便可正常操作。處理
二:將機器電源OFF,再重新ON,即可正常操作。(勿關電源供應器)
A點
(感應桿)
本文件及文件之內容屬國科會南區微系統研究中心所有,謹供列印閱讀,未經許可,請勿以任何形式翻製抄襲。This document is the property of the NSC Southern Region MEMS Research Center.You are very welcome to browse
and print out the document. It is extremely illegal to copy any part of this document in any forms without permission! Document Type Title Document No.Edition Editor Date
SOP Mask Aligner2黃盈捷&黃淑惠2003/6/12
狀況三:以power meter量測汞燈其值低於10,且需要延長
曝光時間才能顯影出來。
狀況四:踩IR腳踏,卻無法產生IR光
處理:檢查IR光源是否打開(請勿超過刻度5)或燈泡是否鬆脫,若
否請通知技術人員更換IR燈泡。
5.0廠商資料
Instru_name光罩對準機
Instru_name_eng Mask Aligner
Instru_type500-IR
Univ_id資騰科技
使用等級C
購買日期86年02月19日
6.0參考文獻
1.劉博文,ULSI製程技術,第七章微影製程技術,文京圖書有限公司,90年1月。
2.莊達人,VLSI製造技術,第七章微影,高立圖書有限公司,89年8月四版。
3.資騰科技(代理OAI)提供,Model500-IR Mask Aligner Operation Manual.
本文件及文件之內容屬國科會南區微系統研究中心所有,謹供列印閱讀,未經許可,請勿以任何形式翻製抄襲。
This document is the property of the NSC Southern Region MEMS Research Center.You are very welcome to browse
and print out the document. It is extremely illegal to copy any part of this document in any forms without permission! Document Type Title Document No.Edition Editor Date
SOP Mask Aligner2黃盈捷&黃淑惠2003/6/12