高级网络技术实验报告
一、实验目的(本次实验所涉及并要求掌握的知识点)
6.2 实验 1:点到点链路上的 OSPF
通过本实验可以掌握
①在路由器上OSPF 路由进程;
②启用参与路由协议的接口,并且通告网络及所在的区域;
③度量值Cost 的计算;
④Hello 相关参数的配置;
⑤点到点链路上的OSPF 特征;
⑥查看和调试OSPF 路由协议相关信息。
6.4.1 实验3:基于区域的OSPF 简单口令认证
①OSPF 认证的类型和意义;
②基于区域的OSPF 简单口令认证的配置和调试
6.4.2 实验4:基于区域的OSPF MD5 认证
①OSPF 认证的类型和意义;
②基于区域的OSPF MD5 认证的配置和调试
6.4.3 实验5:基于链路的OSPF 简单口令认证
①OSPF 认证的类型和意义;
②基于链路的OSPF 简单口令认证的配置和调试
6.4.4 实验6:基于链路的OSPF MD5 认证
(1)OSPF 认证的类型和意义;
(2)基于链路的OSPF MD5 认证的配置和调
二、实验内容与设计思想(设计思路、主要数据结构、主要代码结构)
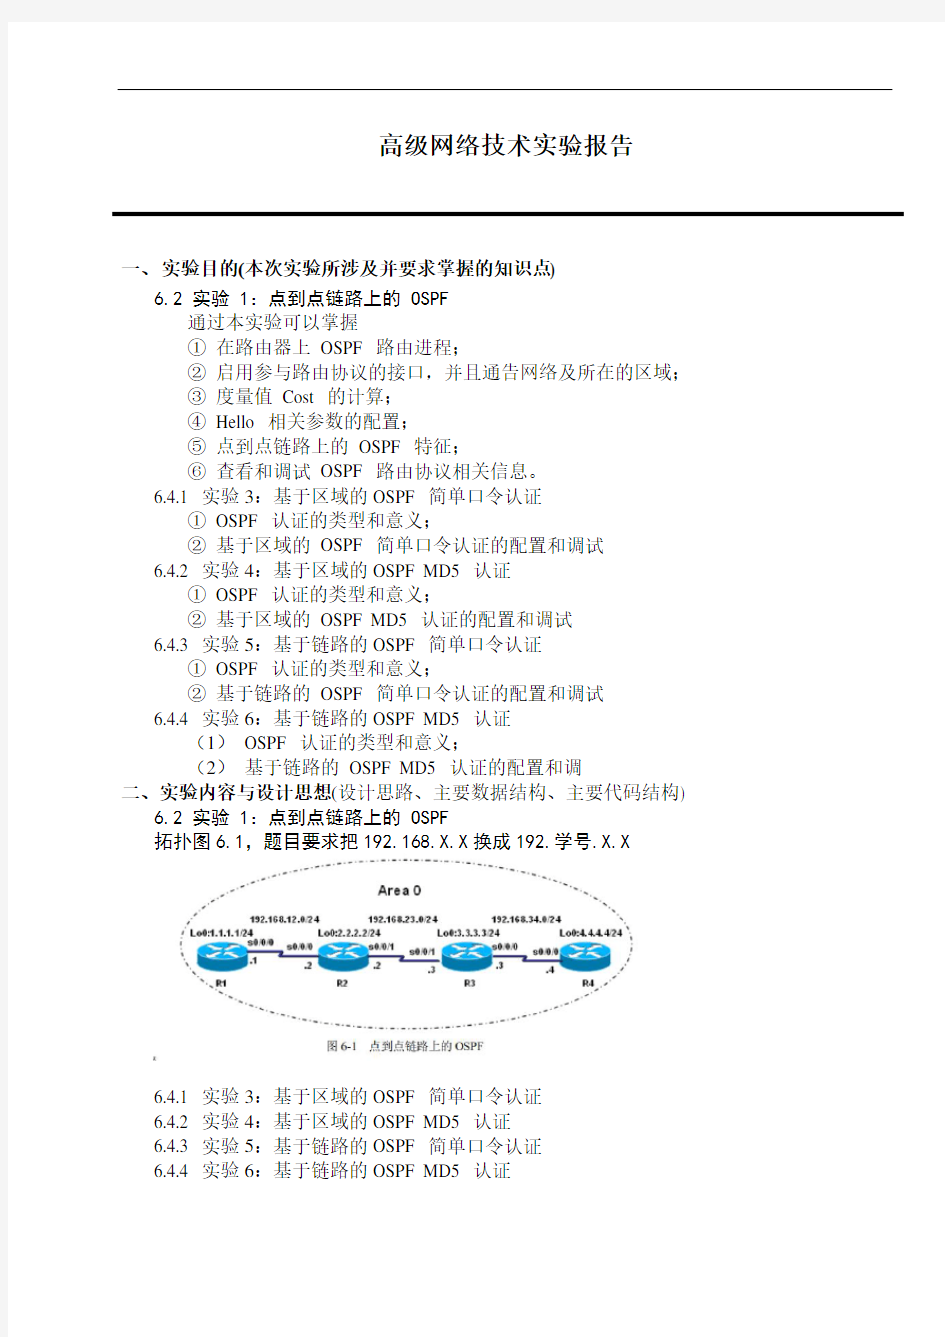
6.2 实验 1:点到点链路上的 OSPF
拓扑图6.1,题目要求把192.168.X.X换成192.学号.X.X
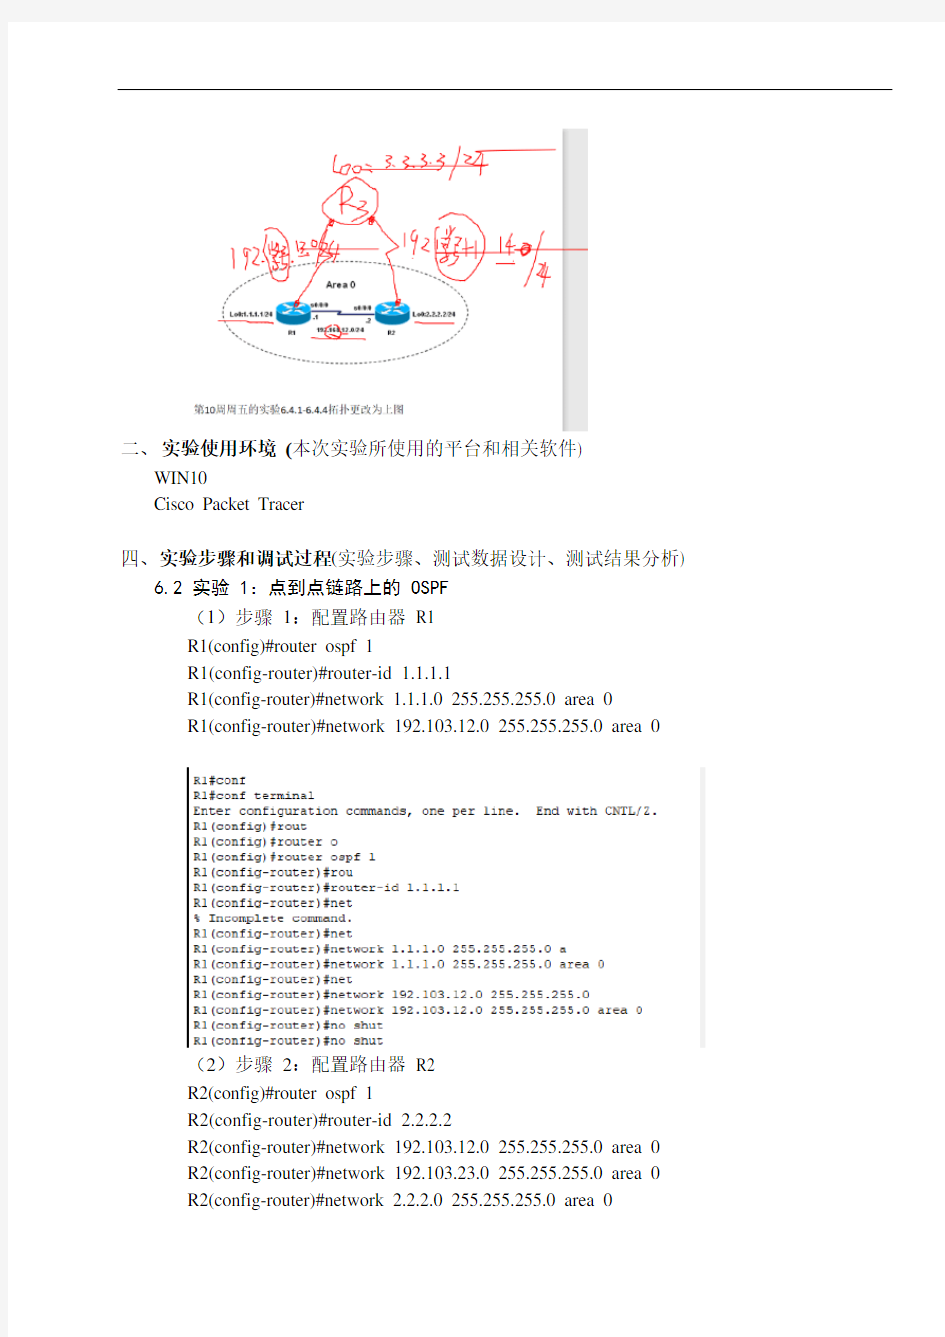
6.4.1 实验3:基于区域的OSPF 简单口令认证
6.4.2 实验4:基于区域的OSPF MD5 认证
6.4.3 实验5:基于链路的OSPF 简单口令认证
6.4.4 实验6:基于链路的OSPF MD5 认证
二、实验使用环境(本次实验所使用的平台和相关软件)
WIN10
Cisco Packet Tracer
四、实验步骤和调试过程(实验步骤、测试数据设计、测试结果分析)
6.2 实验 1:点到点链路上的 OSPF
(1)步骤1:配置路由器R1
R1(config)#router ospf 1
R1(config-router)#router-id 1.1.1.1
R1(config-router)#network 1.1.1.0 255.255.255.0 area 0
R1(config-router)#network 192.103.12.0 255.255.255.0 area 0
(2)步骤2:配置路由器R2
R2(config)#router ospf 1
R2(config-router)#router-id 2.2.2.2
R2(config-router)#network 192.103.12.0 255.255.255.0 area 0
R2(config-router)#network 192.103.23.0 255.255.255.0 area 0
R2(config-router)#network 2.2.2.0 255.255.255.0 area 0
(3)步骤3:配置路由器R3
R3(config)#router ospf 1
R3(config-router)#router-id 3.3.3.3
R3(config-router)#network 192.103.23.0 255.255.255.0 area 0 R3(config-router)#network 192.103.34.0 255.255.255.0 area 0 R3(config-router)#network 3.3.3.3 255.255.255.0 area 0
(4)步骤4:配置路由器R4
R4(config)#router ospf 1
R4(config-router)#router-id 4.4.4.4
R4(config-router)#network 4.4.4.0 0.0.0.255 area 0
R4(config-router)#network 192.103.34.0 0.0.0.255 area 0
(5)步骤5:调试参数
show ip router
环回接口下修改网络类型为”Point-to-Point”,操作如下:R2(config)#interface loopback 0
R2(config-if)#ip ospf network point-to-point
这样收到的路由条目的掩码长度和通告的就一致了
Show ip ospf
Show ip ospf interface
Show ip ospf dateba
(6)实验截图
6.4.1 实验3:基于区域的OSPF 简单口令认证
1、先按照实验要求连接好设备,并配置名称、ip、环回口IP
2、配置路由器R1
R1(config)#router ospf 1
R1(config-router)#router-id 1.1.1.1
R1(config-router)#network 192.103.12.0 255.255.255.0 area 0
R1(config-router)#network 1.1.1.1 255.255.255.0 area 0
R1(config-router)#area 0 authentication //区域0 启用简单口令认R1(config)#interface s0/0/0
R1(confi-if)#ip ospf authentication-ke cisco //配置认证
3、配置路由器R2
R1(config)#router ospf 1
R1(config-router)#router-id 2.2.2.2
R1(config-router)#network 192.103.12.0 255.255.255.0 area 0
R1(config-router)#network 2.2.2.2 255.255.255.0 area 0
R1(config-router)#area 0 authentication //区域0 启用简单口令认R1(config)#interface s0/0/0
R1(confi-if)#ip ospf authentication-ke cisco //配置认证
4、实验调试
(1)show ip ospf interface
环回接口下修改网络类型为”Point-to-Point”,操作如下:R2(config)#interface loopback 0
R2(config-if)#ip ospf network point-to-point
(2)show ip ospf
5、情况:
以上输出表明区域0 采用简单口令认证。
①如果R1 区域0 没有启动认证,而R2 区域0 启动简单口令认证,则R2 上出现下
面的信息:
*Feb 10 11;03;03.071;OSPF;Rcv pkt from 192.168.12.1 Serial0/0/0 ;Mismatch Authentication Type.Input packet sp0,we use type 1
②如果R1 和R2 的区域0 都启动简单口令认证,但是R2 的接口下没有配置密码或密
码错误,则R2 上出现下
*Feb 10 10;55;53.071;OSPF;Rcv pkt from 192.168.12.1 Serial0/0/0 ;Mismatch Authentication Key-Clear Te
6、实验拓扑图:
6.4.2 实验4:基于区域的OSPF MD5 认证
1、先按照实验要求连接好设备,并配置名称、ip、环回口IP
2、配置路由器R1
R1(config)#router ospf 1
R1(config-router)#router-id 1.1.1.1
R1(config-router)#network 192.103.12.0 255.255.255.0 area 0
R1(config-router)#network 1.1.1.1 255.255.255.0 area 0
R1(config-router)#area 0 authentication message-digest //区域0 启用MD5 认证
R1(config)#interface s0/0/0
R1(config-if)#ip ospf message-digest-key 1 md5 cisco //配置认证key ID 及密匙
3、配置路由器R2
R2(config)#router ospf 1
R2(config-router)#router-id 2.2.2.2
R2(config-router)#network 192.103.12.0 255.255.255.0 area 0
R2(config-router)#network 2.2.2.2 255.255.255.0 area 0
R2(config-router)#area 0 authentication message-digest //区域0 启用MD5 认证R2(config)#interface s0/0/0
R2(config-if)#ip ospf message-digest-key 1 md5 cisco //配置认证key ID 及密匙
4、实验调试
(1)show ip ospf interface
环回接口下修改网络类型为”Point-to-Point”,操作如下:
R1(config)#interface loopback 0
R1(config-if)#ip ospf network point-to-point
输出最后两行信息表明该接口启用了MD5 认证,而且密钥ID 为0 (2)show ip ospf
以上输出表明区域0 采用MD5 认证
5、情况:
①如果R1 区域0 启动MD5 认证,而R2 区域0 启动简单口令认证,则R2 上
出现下面的信息:
*Feb 10 11;08;13.075;OSPF;Rcv pkt from 192.168.12.1 Serial0/0/0 ;Mismatch Authentication Type.Input packet specified type
2,we use type 1
②如果R1 和R2 的区域0 都启动MD5 认证,但是R2 的接口下没有配置key ID
和密码或密码错误,则R2 上出现下面
的信息:
*Feb 10 11;08;13.075;OSPF;Rcv pkt from 192.168.12.1 Serial0/0/0 ;Mismatch Authentication Key-No message digest key 1
on interface
6、实验拓扑图:
6.4.3 实验5:基于链路的OSPF 简单口令认证
1、先按照实验要求连接好设备,并配置名称、ip、环回口IP
2、配置路由器R1
R1(config)#router ospf 1
R1(config-router)#router-id 1.1.1.1
R1(config-router)#network 192.103.12.0 255.255.255.0 area 0
R1(config)#interface s0/0/0
R1(config-if)#ip ospf authentication //链路启用简单口令认证
R1(confi-if)#ip ospf authentication-ke cisco //配置认证
3、配置路由器R2
R2(config)#router ospf 1
R2(config-router)#router-id 2.2.2.2
R2(config-router)#network 192.103.12.0 255.255.255.0 area 0
R2(config)#interface s0/0/0
R2(config-if)#ip ospf authentication //链路启用简单口令认证
R2(confi-if)#ip ospf authentication-ke cisco //配置认证
4、实验调试
(1)show ip ospf interface
环回接口下修改网络类型为”Point-to-Point”,操作如下:R2(config)#interface loopback 0
R2(config-if)#ip ospf network point-to-point
5、链路拓扑:
6.4.4 实验6:基于链路的OSPF MD5 认证
1、先按照实验要求连接好设备,并配置名称、ip、环回口IP
2、配置路由器R1
R1(config)#router ospf 1
R1(config-router)#router-id 1.1.1.1
R1(config-router)#network 192.103.12.0 255.255.255.0 area 0
R1(config-router)#network 1.1.1.1 255.255.255.0 area 0
R1(config)#interface s0/0/0
R1(config-if)#ip ospf authentication message-digest //接口s0/0/0 启用MD5 认证R1(config-if)#ip ospf message-digest-key 1 md5 cisco //配置认证key ID 及
3、配置路由器R2
R1(config)#router ospf 1
R1(config-router)#router-id 2.2.2.2
R1(config-router)#network 192.103.12.0 255.255.255.0 area 0
R1(config-router)#network 2.2.2.2 255.255.255.0 area 0
R1(config)#interface s0/0/0
R1(config-if)#ip ospf authentication message-digest //接口s0/0/0 启用MD5 认证
R1(config-if)#ip ospf message-digest-key 1 md5 cisco //配置认证key ID 及
4、实验调试
(1)show ip ospf interface
五、实验小结(实验中遇到的问题及解决过程、实验体会和收获)
1、实验一基本没有遇到什么问题,就是开启点对点后
Show ip ospf interface 看不到想要的接口数据
但是另外一个接口不开启的时候就是可以的
2、实验6.4.3和实验6.4.4不知道为什么最后不能开启简单密钥认证和MD5认证,一开始以为是实验数据或者拓扑连错了,又重做了一遍,但是发现还是不行,下来再找找原因。